Viser innlegg med etiketten Spring. Vis alle innlegg

tirsdag 31. mars 2015

A Prima Mixed Media vintage Telephone box - a class

 Last weekend, I had an advanced Silhouette class. One of the tasks for the participants, was to create their own telephone box from a photo.
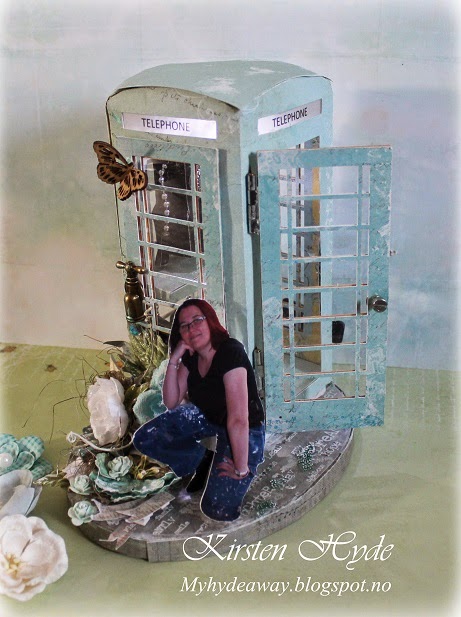

This photo box, is my own design. The photo box is made with Papers from Prima's Sun Kiss Collection - Sun Dried. I have mounted a small led light inside the photo box. The battery is hidden in the roof of the telephone box. I have used a 3V battery from an old computer. The switch for the led light is from an electrical tea light, that I dismantled.
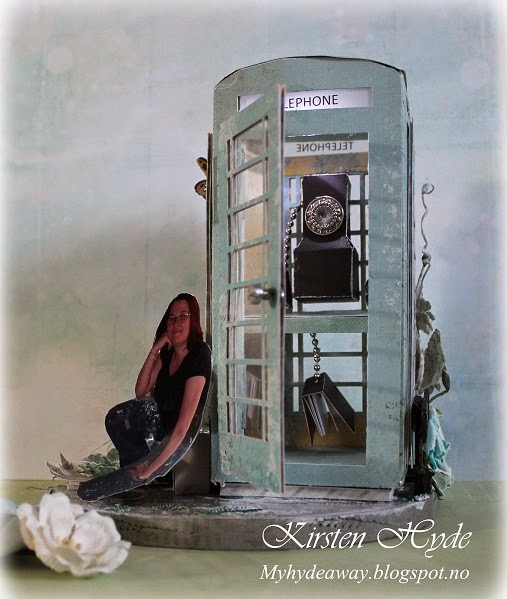


I have created a vintage telephone inside the telephone box. I have also made small telephone books, which is hanging from the telephone table inside the box. The door to the telephone box is hinged, and locks with a magnet.
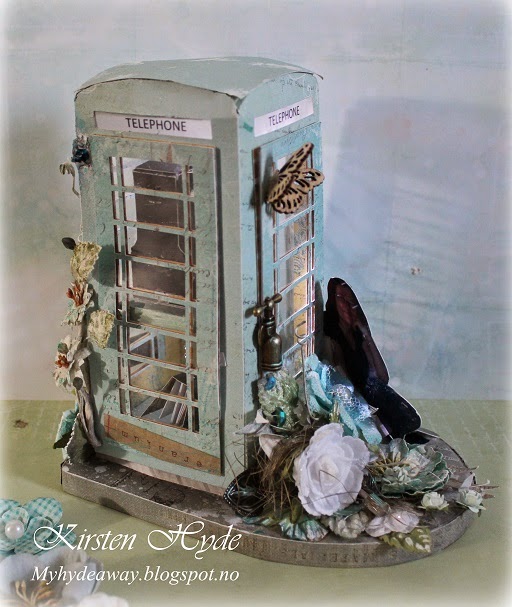

The flowers are mainly from Prima, but some of them are also from Wild Orchid craft. The base is done with papers from The Stationers desk. The base has also been covered with an overlay with words. The overlay was the base for a set of Prima flowers. I have always saved these overlays, to see if I could use them for something. I have also used Gesso, micro beads, stamps and different paints on the base, to create some effects.
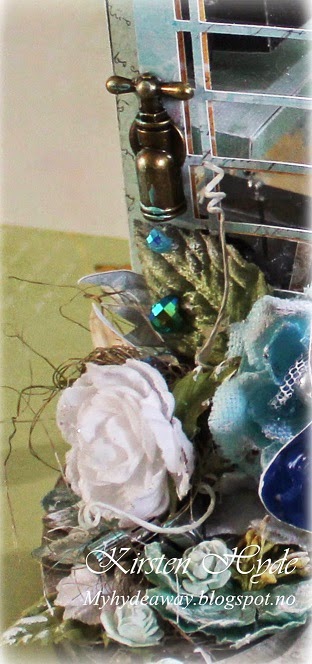

The tap, is from a Prima set, designed by Ingvild Bolme. I have used Meta Mica to create effects on the tap. The water drops has been made by cutting half beads from round to drops.
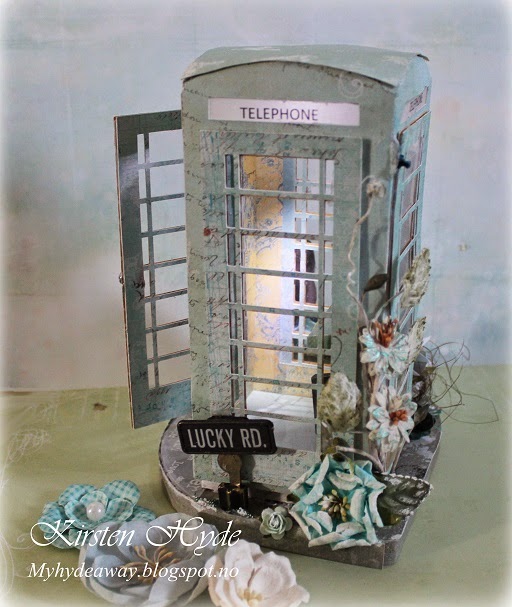

The sign in from Prima, and has been mounted on a part from a vintage type writer.
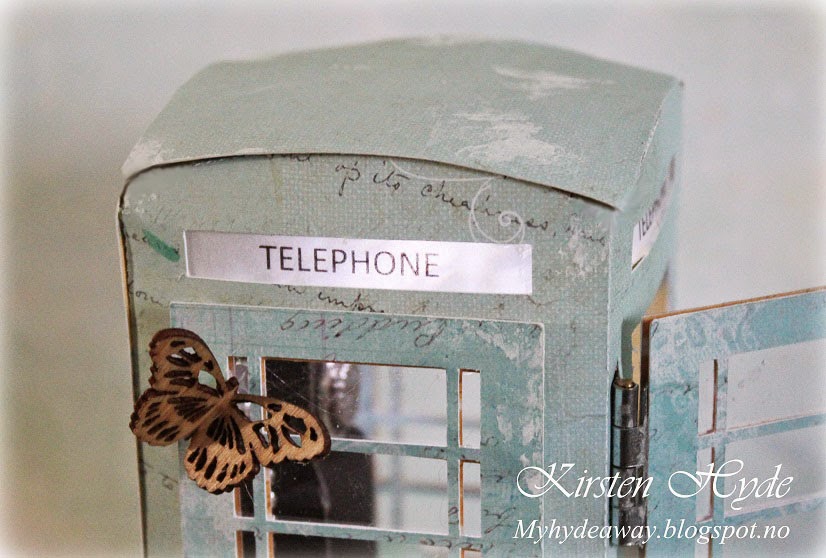

The butterfly is a wood icon from Prima.


I am entering these challenges:

søndag 8. februar 2015

Invitation cards made for Hobbykunst

Hobbykunst has got a huge sale in their shop at the moment. One of the papers on sale is this gorgeous Prima paper: Botanical - Walk in the Park. I have created an invitation card and a simple place card with the papers.


I have used flowers from Prima and Wild Orchid. The leaf and doily dies are from Prima. 


The text "Invitasjon" has been written in word, and printed out.


The place card, is  a simple place card. The butterfly is made with leaf dies from Prima.

I am entering these challenges:


mandag 5. mai 2014

Blog hop with StampARTic and Project Life Norway


Denne blogghoppen er nå over. Vinner trekkes snart.

This Blog Hop is over. The winner will be published soon.


Projectlifeinorge og StampARTic har gått sammen om en felles blogghopp nå i mai,
og her kan du få sjansen til å vinne mange flotte premier ved å legge igjen kommentarer i bloggene til designteamene og i hovedbloggene.

Du må gjøre følgende:

Besøk hver av DT-jentene på både StampARTic og Projectlifeinorge,
der du legger igjen en liten kommentar til hver enkelt eller den du måtte ønske!
Jo flere kommentarer du legger igjen, jo bedre vinnersjanser har du!

Når du har vært på bloggrunden går du inn i StampARTic- eller/og Projectlifeinorgebloggene og legger deg til som følger både i bloggen og på våre Facebook-sider. Tilslutt legger du igjen en liten kommentar om at bloggrunden er fullført! Her har du sjans å vinne 2 hovedpremier om du besøker begge bloggene!

StampARTic's on Facebook
Projectlifeinorge on Facebook - her må du legge deg til som venn!


Fristen for blogghoppingen er 31. mai 2014.


Ekstra trekning:
Går du inne på våre Facebook-sider og liker oss, så har du ytterligere sjans til å vinne en premie!


Projectlifeinorge on Facebook - her må du legge deg til som venn!

Fristen for blogghoppingen er 31. mai 2014.


Begge designteam har jobbet etter en felles oppgave: 


og her ser du mitt resultat:


Jeg laget en boks, fylt med små, enkle kort for enhver anledning.
Jeg har brukt papirer fra Graphic- 45 - Botanical Tea 


Alle blomstene på toppen er hjemmelaget. Noen blomster er klippet ut av papiret og andre er stanset ut og limt over hverandre og bretta for å lage en #D effekt


Selve boksen, har jeg laget mal til selv.


Boksen er fylt med små kort, både til kvinner og menn. Det å lage maskuline kort med denne serien av ark, var en liten utfordring.


Jeg har laget en video for å vise boksen. 


Blogghopp-lista ser ut som følgende:


Her er premien fra meg...


For å være med på trekningen av denne premien, må du legge igjen en kommentar under innlegget.


Hovedpremiene hos StampARTic og Projectlifeinorge er sponset av


OG DE FLOTTE HOVEDPREMIENE DU KAN VINNER ER HER

PROJECTLIFEINORGE:


STAMPARTIC:


Lykke til på bloggrunden :-)

Denne blogghoppen er nå over. Vinner trekkes snart.

This Blog Hop is over. The winner will be published soon.


Jeg deltar på disse utfordringene:

onsdag 26. mars 2014

A cracker box with template

StampARTics design team were given North Star Stamps, to create something with. I was given the stamp.  I have used the stamp "Thank you for being you, you make me happy", from North Star Stamps.


 I made a cracker box, using papers from Prima.


The little tortoise is an old Kinder egg figure.


Template for the cracker box:

I am entering these challenges:


onsdag 8. januar 2014

A baby bucket


 This is a gift bucket that was published in October in the Norwegian magazine - Ett trykk. The bucket has room for a gift, and was made 3D with acetate outside so the scene inside the edges of the bucket can be seen.
  

The stamps are from Penny Black: Fairy Sweet - Clear Stamps. I think they are adorable. The stamps are coloured with Promarkers.


The grass is a Silhouette file.


The background paper is from Pion design.


The handle is made from wire. The flowers are mainly Mathia roses


I have used a Martha Stewart edge punch to create the boarder at the top.

søndag 16. juni 2013

Love you to the moon and back - altered box


There is a new challenge over at Kort o Mania. This time the challenge is to alter a box and it has to be romantic. 


So, I found a small box at Søstrene Grene. The inspiration for the box was the phrase "Love you to the moon and back". I also added another challenge for myself. I wanted to see if it was possible to "lift" a card and make something different than a card. The set up is a lift from Kjersti in trykkpressas challenge.


The moon is made from shaping a Styrofoam ball, covering it with old book pages and painting it with glow in the dark paint.


The flowers are mainly Mathia flowers. The rabbit is from" Graphic 45, once upon a springtime collection - Diecut". 


The background is from "Graphic 45: Leafy Treetops - Secret Garden". The butterfly in the top right corner is from Kort og Godt.


The grass is made from "Prima paper - Annalee Collection - Romance". The box is covered with paper from "Melissa Frances - C'est la vie - Green Honeycomb paper". I am giving the text away as as a freebie ;)


The outside of box has got a phrase from "Graphic 45: Springtime - Secret Garden"


I am entering these challenges:

tirsdag 16. april 2013

A baby card with a spring theme - DT Kort O Mania


I have made a baby card with a spring theme. The paper is from "Kort og Godt -  Blomsterglede - Roser". The background has been painted with Gesso, using a homemade stencil. I have also coloured the background with distress ink - using a paper doily as a stencil. I have added a tatting doily behind the baby. The stamp is a digital stamp from Mo Manning - "Teacup Fairy".  The flowers are from different manufactures - I have just had a dive in my flower draw. I have added Gesso to the flowers to give them a shabby look. The butterflies are cut out from the background paper and added to make a 3D effect.

I am entering these challenges:


mandag 25. mars 2013

A fairy in a bell jar - with tutorial

As a part of the design team at Hobbykunst, I got a Glass Ornament from Meslissa Francis and was asked to make something out of it.


I made a small "fairy in a bottle". The grass, base and the mushroom is decorated with old book pages. The little fairy boy is cut out from an old book. The fairy wings and butterflies are from Kort og Godt. The cut flower and small fairy in the grass are from an old Graphic 45 paper, Once Upon a Spring Time. 


Around the edge of the glass, I have glued a lace. The glass has a simple circular cardboard as base. This kind of base is not ideal to make 3D crafts om - so I made my own base. I have added the tutorial and templates for my base.  


_________________________________________________________  


Templates and Copyright - Please read.

This is my own template. You are free to use my templates, and publish your own craft. However, it would be nice if you link back to me. Please do not sell or publish my templates, as they are or edited! My templates are copyrighted by law.


Dette er min egen mal. Du kan fritt bruke malen til å lage dine egne arbeider. Du kan også fritt publisere ditt eget arbeide. Jeg ville imidlertid satt pris på om du linket tilbake til meg. Du har ikke lov til å publisere eller selge mine maler, som de er eller redigert. Mine maler har copyright under  Åndsverksloven.


_________________________________________________________  


Template: 

(Click on the picture to get a larger version):


Tutorial:


1) Cut out the pieces. I have used 200g card stock for this base.
2) Use the small circle (top) and the 19 cm long rectangle. 
3) Glue on the flips on one side of the rectangle.
4) Glue the side to the top circle, you now have the start of a cylinder.
5) Use the ring, that the glass will sit on, and the 24 cm rectangle. 
6) Glue the side to the the ring.
7) Side glued to the ring
8) You have to sets for the base. Add some glue to the inside of the ring (not on the side, but on the inside of the ring itself)
9) Put the ring around the cylinder, and adjust the level of the ring - so the cylinder and the ring both touch the table. The base is starting to take form.
10) Turn the the base around.
11) Glue (the bottom) circle to the base. Make sure the flips from the inner circle are glued on the inside of the circle under the base, and the flips on the outside are glued on the outside of the circle under the base.
12) Glue the (decorative boarder under the base) to the bottom of the base.


Tutorial for the mushroom: 


13) Start with your base that you made above.
14) Take a piece of card (I have used 200g)
15) Role the card and glue together.
16) Make a hole in the base to fit the rolled card. I have decentered the hole, because I wanted the mushroom set to one side.
17) Put some glue in the hole and glue the rolled up paper.
18) Use a Styrofoam Egg (6cm).
19) Cut the top of the Styrofoam egg. You only need the top part of the egg for the mushroom
20) Make a hole inside the top of the styrofoam egg to fit the top of the rolled up paper. Add some glue to the hole.
21) Put the styrofoam piece on to the rolled card - and you have got a mushroom.


I am entering these challenges;


Related Posts Plugin for WordPress, Blogger...