fredag 29. september 2017

A paper dress with Prima's St. Tropez collection

From the 22 to the 24th of Septmber, there was a large craft convention in Oslo. I was working on Hobbykunst's stand this weekend. Before the convention, I was asked to create a paper dress from an old styrophone dress form. I had already desided I wanted to create a dress with one of Prima's new collections. The problem, wanting new collections, is waiting for them to get to the shop.

I sorted out the dress form. Covered the dress form with lace, and glued it to the dressform with Finnabair's sculpture medium. After the medium had dried, I painted the dressform with Finnabair's gesso. I used an old, large candlestick as a base for the dress form. The dressform was now about a meter tall. 


I decided I wanted to create the dress with Prima's St. Tropez collection. I thought the Sainte Maxime paper was super for a dress.


The stand at Design by me, with the paper dress at the front.


The skirt has been created over an underskirt. I added a crinoline over the underskirt, to mount the ruffles - flounces. The skirt has been created with  Prima's Sainte Maxime paper - St. Tropez and black cardstock. 


The flowers used are Prima flowers from the Love Clippings collection: All Of Me Loves All Of You and Forever & Always.


The top of the black skirt has lots and lots of feathers, created with Rayher's feather dies.


The top band on the dress has been created with paper triangles, sawn together.


Enjoy :) 

torsdag 28. september 2017

Time for tea card

Hello everyone. Today I am showing you a new card with the Time for Tea collection.

The image,  Tea-riffic, has been colours with distress ink on water colour paper. The image has been cut out, using the Fancy Rectangles & Layers Die Set. This die set is perfect in size for cutting out motives from LDRS.  


The shape of the card has been made with the Allifair Build-A-Card Die Set. These sets are fantastic to use to create a shaped card. I have used different diecuts and added layers. I have also used white diecuts made with the Lock-Itz - Flutterby die set.

The paper pad used for this card is the Time For Tea - 6x6 Paper Pack


Wishing you a creative day

mandag 25. september 2017

Paper lantern with template and tutorial

This year, I have been writing articles for the magazine Ett trykk. In the June magazine, I did a tutorial for a lantern.  The summer has been hectic for me, with moving and changing job. Crafting and bloging has been on hold. This is one of the blogposts that has been on hold for a while.

The lantern has been made with papers from Kaisercraft that makes it look like a real lantern. 


Ett trykk's June edition.


The lantern has been made in two seperate pieces. A base and the lantern. I have used a small glass inside the lantern, with an electric tea light. Don't use a proper tea light inside this lantern.


Creating the lantern:


Cut the pieces from the template. You need four pieces.  Choose eighter the lantern in one colour or create the roof of the lantern in a different colour (middle template). Glue the two pieces together and follow the instructions bellow. You also need four frames for the windows.


The four pieces cut out from the template. Score along the stiched lines.


Fold along the scored lines.


Glue two and two pieces together at the base. Wait with gluing the roof. 


Glue the base pieces together. Wait with the roof.


Add a piece of cardboard to the top of the lantern. This is to create stability.


Add glue or good quality dubble sided sticy tape to the tags at the side of the four roof pieces.


Glue the roof pieces together at the sides. Glue the four pices over each other at the top. This is creating a flat top to the lamp.


Add another piece of cardboard to the top of the lamp.


Use a styrofoam or paper egg and a book ring.


Put the book ring through the egg, and close it.


Cut of the bottom part of the egg.


Glue the egg to the top of the lantern. For decoration, this top was painted with rust paste at the end.


Four window frame pieces were cut. I added acetate to the outside of the windows. 


Then the windows were glued to the inside of the lantern.


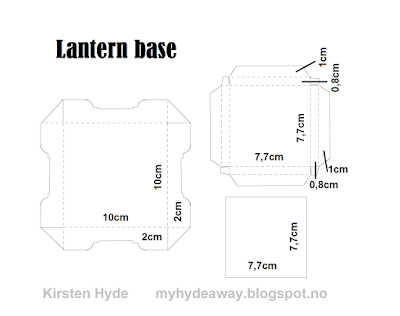
Lantern base:


Cut out the base according to the template. 


Score along the dotted lines.


Fold along the scored lines.


Glue together the base at the left. Glue the base at the right, and glue the square to the bottom of the base at the right.


You end up with two pieces. 


Glue the small part of the base to the middle of the larger base.


Add a piece of cardboard to the base for stability.


Also add some pieces of cardboard to the inside of the feet for stability.


Finished lantern


Now, you have finished the basic lantern. Decorate as you wish.


onsdag 13. september 2017

Just sayin You Hoo

Today, I am showing a layout for LDRS creative. I have been sitting here with all my sweet papers and fantastic dies from LDRS creative, and thinking that I should make a layout. I love creating layouts, and often I create them in layers, in a mixed media style. 

I have used white cardstock as a background paper, and slightly coloured it with distress oxide to mach the papers I wanted to use. The papers are from Time for Tea cardstock.  This is such a supersweet pack of papers, and I could not resist these flamingos. The white dragonflies are made with dies from the Allifair Build-A-Card Die Set.
 
The text stamps and the pink flowers are made with stamps and dies from Hooty Owl - Stamps & Dies.

tirsdag 12. september 2017

Congratulations

Two year ago, I found this sweet pirate stamp from LDRS. The stamp is called Corsair and it is one of the sweetest pirat stamps I have ever seen. The stamp has been stamped with Archival ink on water colour paper and painted with distress ink with a very thin paint brush.


The background paper is from Pink Paislee: #06 - Summer Lights. The word "Gratulerer" has been created with Rayher glitter tape and the die Gratulerer from papirdesign.  The shells and the metal shapes is from a sea shore packet from Rayher. Diecuts has been made with dies from Rayher: Wavesvine,  shells and boats. The button is from papirdesign.


Wishing you all a happy evening :) 


Related Posts Plugin for WordPress, Blogger...