Viser innlegg med etiketten Vintage. Vis alle innlegg

onsdag 13. juni 2018

Vintage suitcase trolley in Harry Potter style

Some time ago, I got a challenge from Hobbykunst to decorate a small trolley. I was asked to make it in a rusty style. I decided to create a vintage suitcase trolley in Harry Potter style. 


All the suitcases are rather small and they are hand made from papers from Maja design's Sofiero collection. I used the papers Princess Margaretas GardenStrolling down the Rose path og Enjoying the fragrance together with white Bazzill.


The trolley is a miniature model of a suitcase. I glued on microbeads from Finnabair with Liquitex heavy gel.  After this, the trolley has got a few strokes of Folk Art rust paint.


The suitcases has been created, making small boxes and adding corners and handles. 


I added different metal charms, a bird huse, shoe, fotball, a spade, a guitar and a little owl.


On the little chest at the back, I aslo added a little tag.


The owl has been created, gluing two owl charms against each other.


Several of the suitcases has been distressed at the edges with Vintage photo distress ink


søndag 29. januar 2017

Vintage signs

Today I am showing a hand made vintage sign for the online magazine, The papercrafting. Interior decor/ home deco is one of the trends that has been in the crafting community for a long time. Vintage signs has been popular for a long time, but now we often see them with a bit of humor. When I looked for a quote to have on my sign, I found the simple sign quote "If your are looking for s sign, this is it". I decided to go for that for my first sign.


The sign is 15cm x 14cm. The sign has been created by gluing together some wooden pieces, sanding it down and painting it black.


Then I created the text as a stencil. I used Silhouette studio to design the stencil, and cut it out with a Silhouette.


At the edges, I have used paperstrips from Kaisercraft's Glisten collection. The paper has been added with gel medium. When the gel medium had dried, I sanded the edges to wear it down a bit.


Enjoy

lørdag 24. september 2016

Nutcracker shaped gift tags

We are showing Christmas tags with the Frosted collection in Kaisercraft's blog today. This time, I have created shaped Nutcracker tags, using one of Kaisercraft's new dies together with the Frosted Collection.


I have used the dies together with the patterned paper, and added white cardtock behind the diecut. As embellishment, I have used wooden snowflakes and the collectables, together with charms, beads and string.


All the four tags are created in the same way, just adding different patterned paper and embellishments.


Kaisercraft Products: PP1005 Paper pad |CT864 Collectables | FL584 Flourish Pack Snowflakes | DD395 Nutcracker.

torsdag 1. september 2016

Vintage Christmas Cards

I often create a lot of Christmas cards, and therefore I like to create several while I am into it. Here, I have created two cards, based on the same layout.


I often decorate the cards inside with panels and a place to write a personal message. The back is simply decorated with panels and a "made by stamp"


Kaisercraft Products: PP1005 Paper Pad | CT864 Collectables | FL582 Flourish Pack | FL584 Flourish Pack Snowflakes | ST911 Monochrome Epoxy Stickers | CS149 Texture Chevron Clear Stamps | IP723 Ink Pad Vintage | DD369 Decorative Die Oval Vintage Frame | SB792 Pearls Chocolate.


tirsdag 13. oktober 2015

A rustic mixed media layout

Today, we are showing rustic layout with the Ma Cherie collection in Kaisercraft's blog.


I decided to use one of my "art" photos, taken in England, with roses against a stone wall.


Text stamps and gesso has been used on the background. I have also used white ink on the flowers.


I have used lots of flowers from the collectables (CT841), but fussy cutted the white edge around them away. I have also used corrugated cardboard (recycled package material) among the papers. 


Kaisercraft materials:   Papers: P1961 Glamour and P1958 Fancy | CT841 Collectables | Paper Blooms F640 Fairy Floss| Mini paper blooms: F657 Fairy Floss and F658 Dusty Pink  |  Ink Pads: IP725 Petal Pink,  IP731 Berry and IP723  Vintage | Rhinestones: SB701 Soft Pink | Pearls: SB785 Lavender.

Other: Gesso, white ink and corrugated cardboard.


onsdag 3. juni 2015

A vintage card for a girl with Pion design

Sometimes we need those cards that can be used for most occasions, and which are quite simple to make. This is a card for a girl/woman/teacher made for Hobbykunst. I also wanted to show, that typical wedding papers can be used for other occasions than weddings.


The Papers are from Pion - Vintage wedding: Wedding bells and Tags. Background stamps and the flowers are from Prima. The motive is from Hobbykunst.


I often decorate the inside and the back of the cards. I have decorated the card clean and simple with my own digital stamp on the back.

tirsdag 2. juni 2015

A mixed media tag for a boy with Pion papers

This is a tag made with Pion's wedding papers for Hobbykunst
I wanted to see if I could create a Mixed Media card for a boy with the papers. 


The papers are: Wedding dress - Vintage Wedding from Pion and brown Bazzill. The tag with the gear dies, is one I have designed myself. I have used Prima Bloom Spray on the background paper.


The vintage image is from one of Hobbykunst's papers. The metal and charms is from Korthobby. The text is a wood icon from Prima.


mandag 1. juni 2015

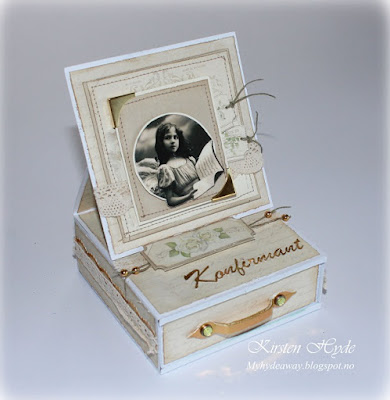
Confirmation Easel dresser card with Pion papers - with template

I have seen a lot of these Easel dresser cards online lately. This is a project made for Hobbykunst.

These are a wonderful way of wrapping a small present.  This one is made by hand from bazzill, paper and cardboard. You can find my template at the end of the blog post.


The papers are from: Pion Vintage Wedding: Wedding dress, Tags  and Wedding bells. I have also used golden paper and a Martha Stewart edge punch at the side of the box. The handle for the draw is made with several layers of golden cardboard. I used Golden MetaMica paint at the edges of the handle. The golden corners are from Rayher. The vintage image is from Hobbykunst.


The draw has a bit of dimension to it. I used cardboard around the edges of the inside of the draw to make it more stable. I used white bazzill to cover the edges of cardboard. I have also used cardboard at the top and the bottom of the box, to make the box stable. The text "Konfirmant" has been cut on a Silhouette.


I am entering these challenges:


tirsdag 31. mars 2015

A Prima Mixed Media vintage Telephone box - a class

 Last weekend, I had an advanced Silhouette class. One of the tasks for the participants, was to create their own telephone box from a photo.


This photo box, is my own design. The photo box is made with Papers from Prima's Sun Kiss Collection - Sun Dried. I have mounted a small led light inside the photo box. The battery is hidden in the roof of the telephone box. I have used a 3V battery from an old computer. The switch for the led light is from an electrical tea light, that I dismantled.


I have created a vintage telephone inside the telephone box. I have also made small telephone books, which is hanging from the telephone table inside the box. The door to the telephone box is hinged, and locks with a magnet.


The flowers are mainly from Prima, but some of them are also from Wild Orchid craft. The base is done with papers from The Stationers desk. The base has also been covered with an overlay with words. The overlay was the base for a set of Prima flowers. I have always saved these overlays, to see if I could use them for something. I have also used Gesso, micro beads, stamps and different paints on the base, to create some effects.


The tap, is from a Prima set, designed by Ingvild Bolme. I have used Meta Mica to create effects on the tap. The water drops has been made by cutting half beads from round to drops.


The sign in from Prima, and has been mounted on a part from a vintage type writer.


The butterfly is a wood icon from Prima.


I am entering these challenges:

torsdag 1. januar 2015

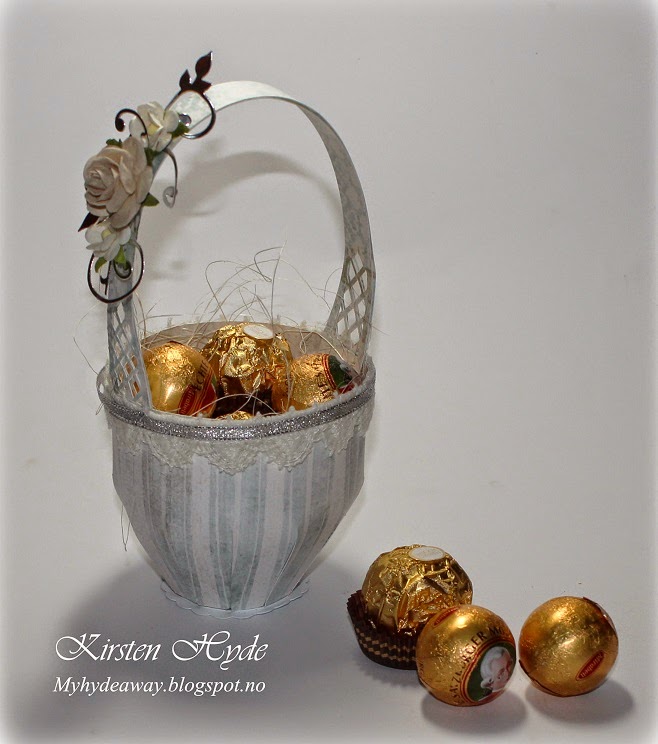
A vintage winter basket with template


Scandinavia paper fun has a new challenge going. The task for January is winter.


I designed winter basket, and filled it with sweets. I have used some old winter papers from Poppydesign. This is a simple basket to create, and I have included the template below.


The basket has been wrapped in a clear bag, ready to be given as a small gift.


_________________________________________________________  


Templates and Copyright - Please read.

This template is my own design. You are free to use my templates, and publish your own craft. However, it would be nice if you link back to me. Please do not sell or publish my templates, as they are or edited! My templates are copyrighted by law.


Denne malen er mitt eget design. Du kan fritt bruke malen til å lage dine egne arbeider. Du kan også fritt publisere ditt eget arbeide. Jeg ville imidlertid satt pris på om du linket tilbake til meg. Du har ikke lov til å publisere eller selge mine maler, som de er eller redigert. Mine maler har copyright under Åndsverksloven.


_________________________________________________________  


Instructions: 

Cut along the lines and fold along the dashed lines. Glue the tabs along the bottom half edge of the basket, under the the one next to it. You will see the basket is shaped as a round basket. Glue the tabs on the end under the basket to the other side - to create a complete round basket. Glue the tabs in the bottom of the basket from the inside and fit the small round circle inside the basket, to cover the tabs. Glue the shaped circle to the bottom of the basket to cover the tabs from the outside. Mount the handle. I made the handle out of two strips of paper to reinforce it a bit.


I am entering these challenges:


mandag 29. desember 2014

A winter box - Guest designer for Scrappaloss

This month, I am a guestdesigner over at Scrappaloss, a Scandinavian blog. The theme this month is blue winter, and I have created a winter box with a little owl decoration inside. The box was sent as a "Christmas card" for a friend.


The box has been made from Prima papers: - Seashore collection - Seahorse. I have used distress paint, silver and black pens, stencils and gesso to create patters in the paper.  I have also used silver glitter to create the glittery snowflake. I have used some old lace under the snowflakes, and silver-glitter ribbon.


The wood icons are from Prima. The owl is an old brad, mounted inside a frame.The swirls are die cuts, made with dies and silver paper. 


I have made room for a small owl inside the box, and made room for a small personal note inside the lid. 


I am entering these challenges;


Related Posts Plugin for WordPress, Blogger...