Viser innlegg med etiketten Pion. Vis alle innlegg

søndag 8. mai 2016

Creating paper dresses

For some reason, I really love creating paper dresses. I guess it challenges me in some way. Designing dresses is an art form that I truly admire. I have sew quite a lot of dresses for myself and for my daughter. This was often due to often not finding "the right dress" for myself, and it was easier to to make one. 

Creating a lot with paper, combining crafting with paper and dressmaking, is a fantastic mix. Although creating paper dresses, often involves skills in dressmaking and knowing the difference in the material you are working with. Paper has a completely different way of folding and "behaving" when you work with it. This also depends on the paper brand, as the quality of the paper is completely different.

My first two dresses were sewn out of coffee filters. I guess coffee filters are a versatile material to work with, and a good material to choose if you want to start to create paper miniature dresses. These dresses were made without creating a paper pattern first. The dresses created from paper, were made with a crinoline and paper ruffles. One of the dresses also has a bustle. These dresses had to be designed, creating a paper pattern first (remade the patterns about 5 times before I was satisfied). The last dress has been made with cheese cloth and a fabric hardener medium. This is also a fantastic way to start to create a dress (full tutorial in my blog)

For now, I have made 5 paper dresses, but I still have a few dresses ready in my head.


Miniature wedding dress


This miniature wedding dress in a box, was created as a wedding card for the magazine Ett trykk. The box itself is 18cm tall. The dress has been sewn with a sewing machine with coffee filters. The box has been created with acetate and papers from Pion design. The flowers for the dress has been hand made.


Steampunk dress


This dress was also sewn out of coffee filters and lace. The dress itself, is sewn as a dress. It has a zip at the back, and can be taken of the dress form. Papers here are from Prima. The dress form is also hand sewn, from a pattern I found online. You can find the pattern here.


Prima Bella Rouge dress


This dress was created for Prima's design team call last year. I applied for Prima and Kaisercraft. I did not make it to the Prima design team, but I was so pleased to make it onto Kaisercraft's design team.

The dress form is hand made. You can find the dress form tutorial in my blog. The dress itself is made with an underskirt, with the long ruffles over it. Then I created a crinoline and added the ruffles. The ruffles had to be gently created to fold in just the right place. The pattern for the dress, was made about 5 times. I used about 100 hours to create the dress. All the flowers for the dress has been hand made.


The 1870s dress


This dress was created for Kaisercraft, and was shown at CHA - spring 2016. The dress has been created with the Cottage Rose collection, and it is based on historical information of how they were sewing dresses in the 1970s. The dress has been created around an underskirt. Then I created a crinoline, and fixed the ruffles to the crinoline. I also added a bustle at the back. The flowers are hand made. 


Creating thing for CHA, is often difficult. This is because you have very short time to create the items and get them sent back. My papers was stuck in Melbourne, so I totally had 3 evening after work to design for CHA. I used two days to create the pattern for the dress and an evening to create the dress itself.


Prima Wedding dress


This dress was created with Fabric hardener and cheese cloth. Then I added an underskirt created with papers from the Tales of you and me from Prima. 


 There are also tutorials on how to decorate the dress in the blog.


Where Do I start to create paper dresses?

If you are thinking about creating paper dresses. The first thing you need is a dress form. If you don't manage to get hold of one, you may chose to create one yourself.


Creating a dress form:


You can also create a dress form with an old bottle, news paper and wood glue:


How to create a paper dress:

Creating dresses can be an advanced task. Creating my Prima Bella Rouge dress or the Kaisercraft 1870s dress involves skills in dress design and pattern making, that you would learn while you take your specialist tailor education, and can therefore not be explained in a blog post.

Material: Coffee filter:

Creating dresses with coffee filter is often a good start, since that paper is easier to work with. 


Material: Fabric hardener:

Fabric hardener and cheese cloth or lace is a good and easy way of creating dresses. I have created a tutorial on how to use fabric hardener to create a dress.


Material: Paper:

When you make a paper dress, try to first make it in copy paper. It is normal to create a pattern before the dress is being made. This is also where you make adjustments to the pattern. When you are satisfied, you use the copy paper dress as a pattern on your patterned paper. Then you create your dress out of patterned paper.

Remember that the quality of paper is very different. Some papers thick papers, and sometimes you would have to soften the paper with water to make it curve if you make large ruffles. Take care when you add water to paper, as it might dissolve if you are not careful, so take care. Some papers are very thin paper, it folds easily, but it is not very strong for 3D creations. Therefore, you might want to use card stock for support in some places (making sure the support card stock doesn't show). 


I hope you enjoyed, 

best of luck in creating your own paper dress.
søndag 20. desember 2015

Mixed media Kraft bags - part 6

It is almost Christmas, and this is the last post with simple craft bags for this time. Totally, I created 24 different bags. They were for an adventcalendar for a friend.


"Experience" bag


The background has been made with a stencil from Tim Holtz and gesso. Over this, I used left over paper from Papirdesign: julekos. The corrugated cardboard is left overs from some wrapping. The stamp is from Tim Holtz and the rose is a Mathia rose. The small golden edge at the bottom is made with decorated borders dies fra Rayher and glitter paper.

"Invent a new one" bag


I often find it difficult to use yellow in different creations. Therefore, I have challenged myself on this bag. First, I used a Tim Holtz stencil and Mustard seed (yellow) distress paint. I gave the bag a light spray with black acrylic paint. The ruler pattern is made with a stencil from TIm Holtz and black distress ink. The film strip is washi tape. The chevrongs are made with my own stencil. The stamp is from Tim Holtz. I have also used stickers on the background, to create effect.

Vintage bag 


This bag has had a light spray with acrylic paint. The paper in the background is from Papirdesign: julekos. The image is an old vintage image from a diecut sheet. The fir branches is made with Rayhe'*s dies: fircone and branch

24. of December bag


The bag has been decorated with papers from Papirdesign: julekos and craft bazzill. The circle behind the santa is made with Rayher*s Spring Wreath dies in kraft. I have used a red wnd white string with small bells. The number 24, had been cut with a Silhouette in glittercardstock. The motive of the santa is from an old diecut paper. 

Wishing you all a merry Christmas 

onsdag 2. desember 2015

Mixed media kraft bags - part 4

Today, I am showing four new kraft bags, created for Hobbykunst. This time, the simple kraft bags has been decorated as with a Christmas theme. 


"Not to be opened before Christmas..." bags

This bag is simply decorated. I have added gesso and spray from white acrylic paint at the edge of the bag. The Christmas ornament is a stamp from North Star Stamps, stamped on black bazzill with white embossing powder. I have used a  Martha Stewart edge punch on the top edge of the bag. To close the bag, I have cut a few lines through the bag (both sides) with a knife. Then I thread a ribbon through the cut lines.


Snow man bag


The circles at the back of the bag has been made with a home made stencil and white distress paint. The image is from Pion - Glistening Season. I used some cheese cloth behind the image. The fir branches are from Rayher's dies: fircone and branch.


Christmas tree bag


The bag has first got a spray with white paint. The trunk of the tree has been made of corrugated cardboard. The tree itself is made with bits of diecuts, created with Rayher's decorated borders dies. The star has been made with a Martha Stewart snowflake punch, made with golden paper. 


Hug from the heart bag


The chevrongs has been made with my own stencil.  "The white circles" has been made with Rayher's Spring Wreath dies


The fir branches has been made with Rayher's dies: fircone and branch. The Christmas ornament, is made with paper from Papirdesign: julekos


Wishing you a super December.

fredag 6. november 2015

Folding Christmas cards - A class at Hobbykunst and a Template

This month. I am holding two Christmas card classes at Hobbykunst. During the class, we are creating 3 different cards: a shaker card, a small tea light card and a peek a boo card.


Shaker card


This shaker card is created with papers from the new Christmas collections from Papirdesign and Pion. The "Thinking of you" text is a die from Kaisercraft DD333. The circle is a dies from Rayher - Spring Wreath.


The inside of the card is simply decorated with a text from Pion.

Tea light card with template


This is a small tea light card. The card is only 10x10x2,3cm. I have used white and blue bazzill, and panels made with paper from Kaisercraft's Silver Bells collection - Carol. The Fir cone and branch is a die from Rayher. The edge of the card is made with a Decorated boarders die from Rayher. I have used a velcro lock from Rayher to close the card.


The card has room for four tea lights. 

Peek A Boo card


This card is created with Pions new Christmas papers Glistening season. The lace is from Rayher. 


The Peek A Boo card, is an interesting card. When you open the card, the image changes. When you open it, you end up with the text in the window, instead of the image.


This card shows up better in the video.


From the class:


Happy scrapping, and good luck with your Christmas cards.


onsdag 3. juni 2015

A vintage card for a girl with Pion design

Sometimes we need those cards that can be used for most occasions, and which are quite simple to make. This is a card for a girl/woman/teacher made for Hobbykunst. I also wanted to show, that typical wedding papers can be used for other occasions than weddings.


The Papers are from Pion - Vintage wedding: Wedding bells and Tags. Background stamps and the flowers are from Prima. The motive is from Hobbykunst.


I often decorate the inside and the back of the cards. I have decorated the card clean and simple with my own digital stamp on the back.

tirsdag 2. juni 2015

A mixed media tag for a boy with Pion papers

This is a tag made with Pion's wedding papers for Hobbykunst
I wanted to see if I could create a Mixed Media card for a boy with the papers. 


The papers are: Wedding dress - Vintage Wedding from Pion and brown Bazzill. The tag with the gear dies, is one I have designed myself. I have used Prima Bloom Spray on the background paper.


The vintage image is from one of Hobbykunst's papers. The metal and charms is from Korthobby. The text is a wood icon from Prima.


mandag 1. juni 2015

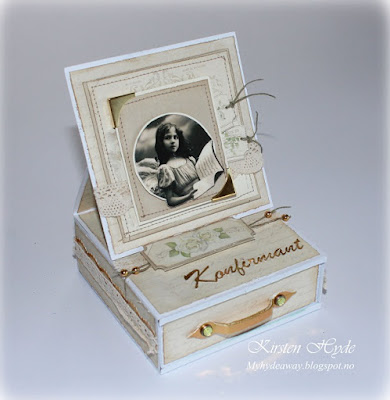
Confirmation Easel dresser card with Pion papers - with template

I have seen a lot of these Easel dresser cards online lately. This is a project made for Hobbykunst.

These are a wonderful way of wrapping a small present.  This one is made by hand from bazzill, paper and cardboard. You can find my template at the end of the blog post.


The papers are from: Pion Vintage Wedding: Wedding dress, Tags  and Wedding bells. I have also used golden paper and a Martha Stewart edge punch at the side of the box. The handle for the draw is made with several layers of golden cardboard. I used Golden MetaMica paint at the edges of the handle. The golden corners are from Rayher. The vintage image is from Hobbykunst.


The draw has a bit of dimension to it. I used cardboard around the edges of the inside of the draw to make it more stable. I used white bazzill to cover the edges of cardboard. I have also used cardboard at the top and the bottom of the box, to make the box stable. The text "Konfirmant" has been cut on a Silhouette.


I am entering these challenges:


You spice up my life - a teacher or friendship gift

Today, I have made a small thank you card for Hobbykunst
This can be used as a card for teacher gift or a for a friend.


The papers are from: Pion: Wedding dress - Vintage Wedding. The 
flowers are Mathia roses. The lace is from Rayher. The image is a digital stamp from Saturated Canary, but these stamps can also be bought as a rubber stamp from Hobbykunst. The stamp had been printed on Kraft and has been coloured with Primsmacolors. The text "Thank you for spicing up my life/ Takk for at du krydrer tilværelsen min" has been printed on a printer.


The card has been attached to a stick. 
The stick has been putted into a pot of Lemon balm spice.


onsdag 25. mars 2015

Working with alcohol ink on backgrounds

We are inspiering you with alcohol inks at StampARTic today. Alcohol ink is always an interesting to use. It gives so many oportunities to colour different materials and backgrounds and inspire me to test out new ways of using it. 


Today, I am showing an acetate based card. The edge is made from Prima's - Seashore - Seahorse paper. The motive is from Pion, but most of the other papers and embellishments are from Prima.


I have used alcohol ink to create some background colour on the acetate, at the edge of the motive. The background has been built up with layers from paper, wood icons, metal, flowers, beads and glitter. At the end, some of the background was also coloured with alcohol ink


The back of the card. The card stand is a free cutting file from Birds Cards.

Prima PPP


I am entering these challenges:


lørdag 21. februar 2015

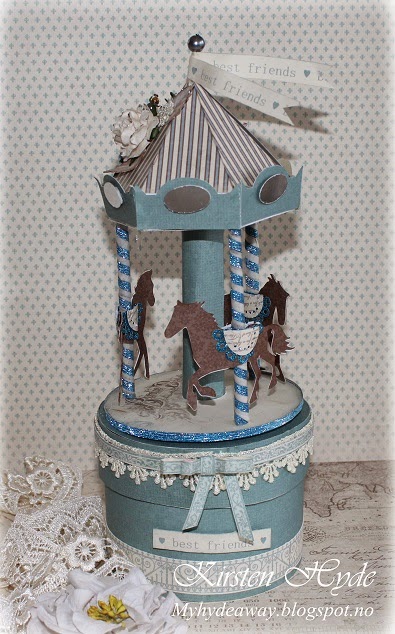
A turning Pion Merry go round

Today, we are using sponsored  Pion papers over at StampARTic. I have created a Merry go round box with papers from Pion.


The Merry go round is on a circular box and it does turn around.


I have used papers from  My Beloved son collection.


The horses have been cut from photos of some horses out of Pion papers. The supports are straws with washitape.


The box is also covered inside with Pion papers.


Here is a little film to show the box and how it is turning around.  

I will be holding a class in creating 3D constructions like this in Larvik

I am entering these challenges:


tirsdag 18. november 2014

A stationary box with Pion

Today StampARTic is showing you creations with papers from Pion design


I created a Stationary box filled with cards and tags with my papers.


I fell so lucky to have got the entire collection of  My Beloved son, with 12x12 papers, 6x6 papers and memory notes - 21 sheets of gorgeous papers!


So I created a Stationary box. The tutorial is made by Henrikke in 2012 and can be found among . StampARTIcs old tutorials.


The stationary box opens and reveals the cards and the tags


The stationary box with the cards and tags. The papers are so nice, that I deiced not add to many embellishments and flowers to the box and cards.


Tags


Five simple tags, using the tags in the set of papers. I have added som Crinkle ribbon from Tim Holtz and colourd it with distress ink.


Miniature cards


The small cards are simple, using the memory notes. The heart is is cutting file from Birds Cards.  The stamp "Thank you for beeing the one you are" is from North Star Stamps. The stamp "De beste ønsker" is from Kreativ Hobby.


Napkin fold card


I have also made a Napkin fold card  after an old tutorial from 2010, made by Marianne Skjelstad. The edge of the card is a cutting file from Birds cards.


The card can be opened after taking of the band.


Revealing the message inside the card.


Card with swirls


This swirls in the base of the card is made with a cutting file from Bird cards. I have added blank acetate inside the card to stabilize it. I have added Pieces from the Pion paper ad half pearls.


The back of the card. There is space to write a message inside the card.


Folding card


This is a folding card with an old StampARTic tutorial by Marianne Skjeldtad from 2009. I have used Crinkle ribbon from Tim Holtz to close the card. The ribbon has been coloured with with distress ink.


The pattern on the half circles is a cutting file from Bird cards.


I have tried to use the differen Pion papers in different ways. This is the memory notes that are used. The stamp is from North Star Stamps.


The back of the folding card.


I hope you got inspired by these cards. I certainly got inspired by the Pion papers. Remember that we have a lot of tutorials over StampARtic and there is also a lot of tutorials and templates in this blog.

I am also entering these challenges:


Related Posts Plugin for WordPress, Blogger...