Viser innlegg med etiketten Published. Vis alle innlegg

onsdag 11. oktober 2017

25th - Layout created for Kaisercrafts Workshop magazine

 This layout was created while I was on the design team for Kaisercraft, featuring last months Letters to Santa collection - P2390 Santa’s Workshop. 


Kaisercraft products: Letters to Santa Paper collection – P2390 Santa’s Workshop, P2396 Christmas Traditions, PS501 Perforated Wishlist, CT890 Letters to Santa collectables, Letters to Santa Flourish Pack, Decorative dies – DD179 lace topper, DD547 Circle Vines, DD347 Numbers, DD129 Words The Little Things, DD924 Decorative Die & Stamp Tailor Made. EM434 Gold Pearls String. Ink Pad sml - IP728 Saffron and IP723 Vintage. Cardstock – CD603 Premium Black, CD651 Kraft, GC107 Glitter Golden. F653 Mini Paper Blooms Ruby.  KM102 Kaisermist Antique Gold.

You can see the instructions on Kaisercraft's home page

I

lørdag 15. juli 2017

Hello Spring - layout with Kaisercraft's Golden Grove collection

This is a layout created for Kaisercraft with their new Golden Grove collection. The layout has been created with instructions that you can find in Kaisercraft's blog.


The photo, is one that I took a few years ago, and edited it in photoshop. 


The layout has been created in layers with die cuts, collectables and flowers.


PAPERS: Golden Grove Collection – P2352 Gold Dahlia, P2353 Greenery, CT886 Golden Collectables, IT017 Blossom Template, Clear Stamps – CS152 Texture Diamonds, CS261 Sentiments – Moments, KM103 Kaisermist yellow, IP719 Small Ink Pad Black, GC101 Glitter Cardstock Midnight, CD603 Premium cardstock Black, Kaisercraft dies: DD381Decorative Die Words Hello, DD547 Decorative Die Circle Vines.

onsdag 12. juli 2017

Find joy in every day - Layout with with Kaisercraft's Keepsake collection

Today, I am showing a layout featured in June's Workshop magazine for Kaisercraft. The layout has been created with the Keepsake collection. 


The layout has been created in layers, with collectables and wooden embellishments.


You can find the instructions for the layout in Kaisercraft's blog.


Kaisercraft products: Keepsake Paper Collection – P2326 Gallery, P2328 Collage, P2329 Collected, P2320 Photomontage SS340 Keepsake Sticker sheet, CT883 Keepsake Collectables, FL602 Snapshot Flourish Pack, Ink Pad - IP721 Gum Leaf, IP724 Bark, IT447 Birch Designer Template.


torsdag 1. mai 2014

A card in a box with tutorial

 These cards were popular at the beginning of the year, an found their way into many craft rooms during the spring. I made this card, with tutorial in January, and sent it to be published in the magazine "Ett trykk". This was published in the April issue.


I made it as a baby basket. I have used lots of different dies. 


This shows the support inside the box, where you fix all the elements, you want to pop-up of the box.


The box can be folded flat and sent in an envelope. 


Template

Glue the tab on the right side of the template, and stick it to the opposite left side of the template. This will form a box.
 
You will end up with a box like this. Cut the supports, and fix them inside the box. The box is ready to be decorated.


mandag 13. januar 2014

12 tags of Christmas 2013 - Art Journal and paper piecing - tag number two

This tag was number two of a series of 12 tags in the December issue of the Norwegian magazine -  "Ett trykk". I wanted to show different styles and techniques. This is an example of  Art Journaling and paper piecing.


I have used Tim Holtz Sizzix: Movers & Shapers Base Die - Tag & Bookplates to create the basis for the tag. To create the background, I used Dylusions spray – Postbox red, squeezed orange and Cherry Pie. Heidi Swap – Color shine – Chartreuse. Then I stamped with Penny Black: Winter Scroll and  Inkadinkado; Christmas Holiday sentiments and Christmas tree. I made the white effects by using a white pen. 

The teddy is a free digital stamp from Dustin Pike, coloured with promarkers. The underwear has been made with paper piecing. Paper piecing is a technique where you stamp the image onto several different papers, cut the different pieces out and glue them together to create the image. On this teddy, the underwear was printed onto blue card stock, cut out and glued onto the coloured teddy.


onsdag 8. januar 2014

A baby bucket


 This is a gift bucket that was published in October in the Norwegian magazine - Ett trykk. The bucket has room for a gift, and was made 3D with acetate outside so the scene inside the edges of the bucket can be seen.
  

The stamps are from Penny Black: Fairy Sweet - Clear Stamps. I think they are adorable. The stamps are coloured with Promarkers.


The grass is a Silhouette file.


The background paper is from Pion design.


The handle is made from wire. The flowers are mainly Mathia roses


I have used a Martha Stewart edge punch to create the boarder at the top.

tirsdag 7. januar 2014

Mad Hatter's birthday crown - a different birthday card

I was Guest Designer for the Norwegian magazine "Ett trykk" in October, and I still have a few items left to publish in my blog.

This was a birthday crown made for a friend, instead of a card. This friend is also a scrapper and has often taken the initiative to make crowns for others for fun for their birthdays - so I decided that she needed a crown for herself. She is very found of G45 - so this brand of papers had to be included in this project.


The inspiration for the shape of the crown came from a metal crown. The crown has been made from card stock and decorated with cut outs from Halloween in Wonderland from G45. The Queen of Hearts is a digital stamp from Sassy studio designs. The "card man" is made from a small playing card, with a polystyrene ball as a head. The hat and feet/stand is made out of paper.


The text "We're all quite mad here! You'll fit right in" is a well known quote from the Alice in Wonderland story.


On the top of the crown, I have used an old chess piece. I have coverd the top with flowers and diecuts.


The crown from the back.


lørdag 30. november 2013

Crossing the ocean - a Mixed Media layout challenge

Once, i read the words: “ You can never cross the ocean unless you have the courage to lose sight of the shore”.  I think this is quite describing, because to get further - one has to challenge oneself and try new things. Sometimes I have to challenge myself too, and try things I haven't done before. It's about a year since I started with Mixed Media, sprays and paint. I started with a class with Sherry Mendoza and Gry Anita Smith Murud. They both gave me lots of inspiration.


Last summer, I was given a task from Hobbykunst, to make a layout about myself, as a part of the Design Team. This was also published in the magazine - Ett trykk in October, and therefore could not be published online before.


I used a canvas and turned i backwards - so I could make a 3D effect inside the canvas


Australia is a country very close to my heart. The background photo is taken from inside a cave from The Rocks at Kangaroo Island, outside Adelaide in Australia. The sea meets the ice on the South Pole on the other side. To create the cave effect in the canvas, I used yes paste.  The photo of the Wallaby and the Koala is also taken on Kangaroo Island. 


Papers: Prima; Familia – Lifetime, Graphic 45; - Olde Curiosity Shoppe - Butterfly Species and Docrafts; Wellington Paper Pack


søndag 24. november 2013

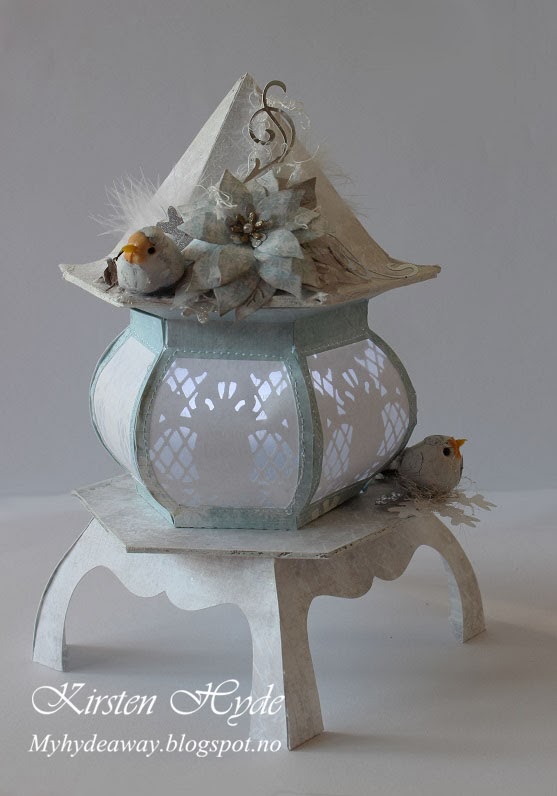
A vintage lamp with template and tutorial


This is a lamp I made for the magazine "Ett trykk" in October. The papers are from Panduro's Christmas collection last year.


The lamp is made with a lid/hat and with room for a led light inside.


The lamp has been decorated with handmade flowers, feathers and a bird.


_________________________________________________________  


Templates and Copyright - Please read.

This is my own template. The inspiration is from looking at a vintage metal lamp. You are free to use my templates, and publish your own craft. However, it would be nice if you link back to me. Please do not sell or publish my templates, as they are or edited! My templates are copyrighted by law.

Dette er min egen mal. Inspirasjonen er hentet fra å se påen gammel metall lykt. Du kan fritt bruke malen til å lage dine egne arbeider. Du kan også fritt publisere ditt eget arbeide. Jeg ville imidlertid satt pris på om du linket tilbake til meg. Du har ikke lov til å publisere eller selge mine maler, som de er eller redigert. Mine maler har copyright under  Åndsverksloven.

_________________________________________________________  


Template


Tutorial


Print out the template in the right sice, and cut out the pieces in patterned paper. 


The panels in this lamp, has been decorated. I made a doilies with a Marianne dies. I made a die cut on both sides of the paper.  I added vellum in front of the paper.  


Make six panels for the lamp. Fold the flaps and the folded lines on the panels


Bend the panels carefully, and glue the flaps. Glue the flaps onto the next panel. This part is a bit tricky.  Add some glue to under the small hexagon. Glue the flaps on the underside of the panels to the hexagon.


All the panels are glued in place. The lamp has got the round shape. Fold in the flaps in the top of the lamp.  Glue on the inside of the flaps in the top, and fold them inside the lamp. 


The lamp part is finished.


Find the legs. You are supposed to have four parts. Fold inn all the flaps. Glue all the flaps and the triangle under the foot that is closest to the flaps. The other triangle is not supposed to be glued. Glue the feet’s together. The triangle with glue is folded under the triangle without glue, and glued together. 


The feet’s are finished. Cover the large hexagon in cardboard with patterned paper on both sides.  


Glue the large hexagon to the top of the legs. 


Glue the lamp parts to the legs.


Cut out all the pieces for the roof. You need 6 parts. Fold inn all the folds and glue the long flaps (on the outside of the flaps). Do not glue the shorter flaps. Glue the flaps together with the roof panel next to it. 


 The roof has been glued


Put a large hexagon on the inside of the flaps of the roof, and glue the flaps to the hexagon. 


Glue a large cardboard hexagon on top of the other hexagon, to create some stability to the roof. Glue patterned paper on the top of the hexagon to cover it. The patterned paper will show in the middle of the inside of the roof.

Then, glue the hexagon with the hole onto the roof. The roof will now look like the picture above. The taps on the inside of the roof is used as support for the long paper strip. This that will make the roof sit firmly on the lamp.


The lamp and the roof is finished.


It’s time to decorate. Electrical tea lights give an orange light. This is why I used a LED light. Do not use a burning light in this lamp - it will burn the lamp!
Related Posts Plugin for WordPress, Blogger...