Viser innlegg med etiketten Redesign. Vis alle innlegg

søndag 12. mars 2017

You never know what you have, until you clean your craft room

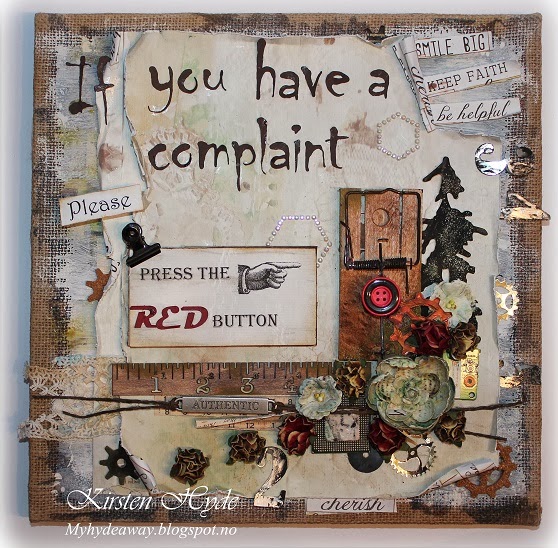
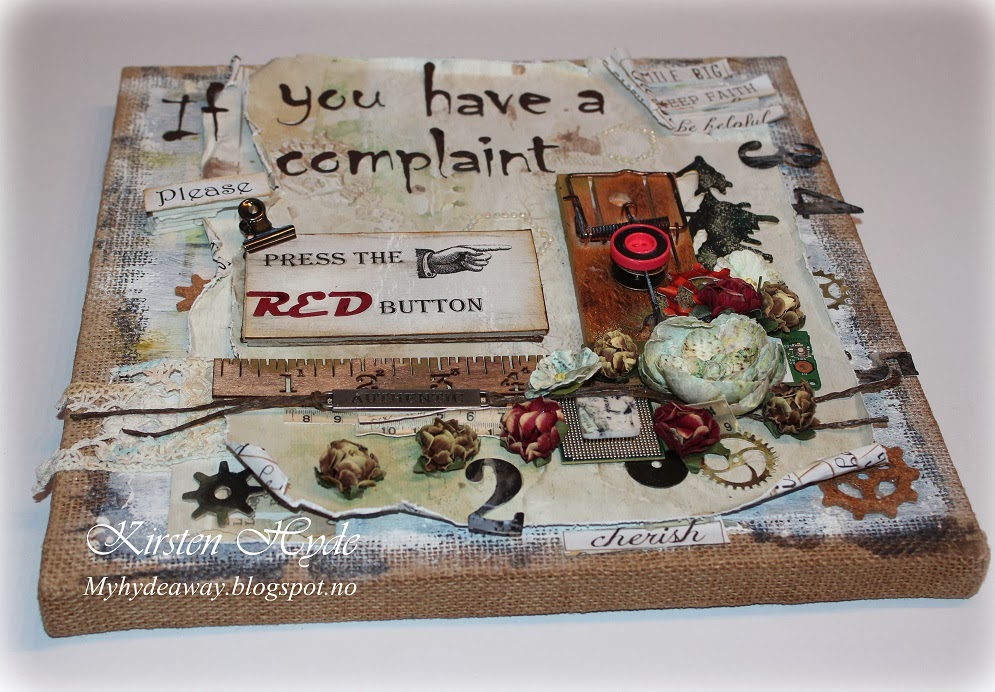
Hand made interior pieces are always fun. I have had some fun with some old wooden pieces, and created vintage signs. This is a fun sign, that I created for my craft room, and has shown for The Papercrafting today. 


Signs like this is a nice personal gift, or a little something to add to your own home.  They are always a fun little thing to have on the wall or on a shelf.


Creating the sign: 

  1. Glue together pieces of wood to create the size you want. When the glue has dries, sand the edges of sign. 
  2. Paint the sign (I used black acrylic paint).
  3. Add the text. I used a hand made stencil, created with a silhouette. There are stencils with letters, or text's that you can get in craft shops. You can also paint the sign in the colour you want the letters, add thickers or sticky letters and paint the sign again. When the paint has dried, remove the added letters. 
  4. You may want to work a bit with the letters after you used the stencil, going over some of them, to tidy them up a bit in places.
  5. The edges here, has a glitter pattern. This has been created using one of Tim Holtz stensils (Set 4 - Mini Layered Stencil Set). I have added blank gesso above the stencil. When the gesso was wet, the glitter was added.


Enjoy 

tirsdag 6. september 2016

Mixed media bottle

A lot of my crafts are create for different Design Teams. Quite a lot of the things I create, have a lot of products on them, and are not necessary cheep. I often say, don't save money on good glue, good paint/mists and the paper collections you want to work with. Sometimes I like to show, that you can indeed create something without spending a lot of money (other than on good glue and paint - and here a bit of flowers too). 

This is one of the things, that was just created for fun. A few weeks ago, I decided to just just create with something that would otherwise have been thrown away. I wanted to re-cycle or up-cycle something that most people would think of as trash. So, as I emptied this bottle of olive oil, I thought this would be ideal. I also used some of the netting from a bag of potatoes, car polishing yarn, old jewelry, beads and a few bits and bobs from my "might be useful draw". 


I glued a lot of different bits and bobs to the bottle, added yarn, netting from the bag of potatoes, The bottle was then painted with white acrylic paint. 


Then the bottle was sprayed with mists and sprays from 13arts, and Finnabairs paint


The flowers are from Wild Orchid and Petaloo


The wood pieces are from Prima, and were bought at Hobbykunst. I was lucky to find a box in the shop with "pick 10 things for next to nothing" 


tirsdag 24. juni 2014

Fun with Mixed Media

I took this photo of my reflection in the sunglasses, last time I was in Australia - on Shell beach at Monkey Mia, Western Australia. I have saved the photo for a fun project.


I decided to do a Mixed Media with a selection from my bits and bobs boxes.


I must admit - Yes I am a hoarder of Mixed Media stash. Always on the lookout for old clocks (gears), old computer parts, sewing machine and type writers. I dismantle them and stock all the bits - and sort them into boxes. A few people have asked me - "What do you do with all those bits and bobs?" Here is an example of what I make.


The background paper is from Prima: Boussole - Cartographer and Bo Bunny (Somewhere in time Evening mist). The Bo Bunny paper was something I won through The Paper Crafting. Flowers are mostly from Prima. I have used Gesso, acrylic paint and distress paint to paint the background. I have also used gesso and a Tim Holtz stencil to create some background effect.


The Mixed Media canvas is a DTcontribution for Hobbykunst


I am entering these challenges:


torsdag 23. januar 2014

If you have a complaint - a mixed media Tim Holtz canvas

There is a new challenge at StampARTic . This time, the challenge is something old or reused. I have reused an old button, a cardboard box, an old lace and old computer parts.


I used a Tim Holtz canvas (Idea-Ology District Market Printed Burlap Panel - Alphabetical). This was rather dark, so I painted it with gesso and distress paint. The paper is from Prima lifetime (familia)


The ruler is from Prima. The mouse trap is an ordinary mouse trap from a hardware store. These are both coloured with alcohol ink. I have also distressed the mouse trap with distress embossing powder.  


The words are cut outs from the paper lifetime (familia) from Prima


 Some of the text has been cut out on a silhouette, other parts has been written and printed out from a PC. The hand is a digital freebie from The graphic fairy. The red button is an old red button.


In between the flowers, I have used some old parts from a computer. The tree is a Tim Holtz dies, cut in an old cardboard box, painted black and embossed with distress embossing powder - pine needles,  shabby shutters and fried burlap. The flowers are from Prima and roses are from Kort og godt


Some of the gears are made by cutting in cork with a Tim Holtz gear dies


I am entering these challenges:


søndag 22. desember 2013

Christmas glitter houses

Soon Christmas. This year has been filled with lots of crafting, especially through entering the European Scrap Battle. This was my semi-final project.  The task was monochromatic.


I made the stand out of  an old MDF board, and covered it with paper. I have added light in the houses and in the light pole. The light is small LED bulbs, connected together. I have added a switch on the back to turn the light on and of.


The house on the left is a template from Little glitter houses. The house on the right is a house inspired by a typical old English house, and is my own template.


The house with the veranda is my own design. The fence is also my own design, after a fence outside an English castle.


The template for the bay Window house can be found here. The light pole is my own design. The little ice rink is made from blue glitter paper.


Wishing you all a Merry Christmas


I am entering these challenges


søndag 10. november 2013

Alice in Wonderland Clock

Just before the summer, I got a Challenge from Connie at Hobbykunst. She gave me a MDF vase to alter, and to show in the shop. She told me, that I could make whatever I wanted to. I turned the vase, and first thought it was a strange thing to get something funny out of. I then thought, I could alter it into a clock.I know that Connie is a fan of Allice in Wonderland, so I made an Alice in wonderland clock.


The MDF vase is turned upside down, and altered. The vase is 47cm tall and is the vase Arizona fra Rayher Hobby Art. 


The clock is made as an illusion of a tree, with the parts of the story from Alice in Wonderland inside. 


The hole Alice is falling through is made from circles made from an old Alice in Wonderland book. I mounted a mirror under the circles, to create an illusion of a long hole.


The hat is hand made. I have also added lots of small playing card under the hat, as this was a part of the story.


Alice fell down the hole, and was too large to get out of the door. She had to drink a potion from a bottle to get smaller. I tried to catch this part of the story. There is a blue led light inside the bottle.


The roses are white Mathia roses from Hobbykunst,  spray painted (Alice in Wonderland style) with dylusions Spray - postbox red, squeezed orange and cherry pie. Some of the leaves are made with a dies from Marianne design, creatables Stencil – Flower and Leaves.


The rope ladder and the swing is made from cardboard and string


Inside the back of the clock, I have made a hole in the clock tree for the Mad Hatters Tea party.


The Mad hatter tea party. There is a small led light above the table, lighting up the tea party


The trees in the small forest is made with a dies from  Marianne dies - Anja's Vintage Decoration. I added blue LED lights behind the trees to make an illusion of a scary forest.

Papers used fir this challenge is cardboard, black and green Bazzill, KaiserCraft – Base Coat Collection – Weathered, distressed – Base Coat og Sovereign – 75 cents. Basic Gray – Hello lucious – inviting,Graphic 45 –  Secret Garden. Halloween in Wonderland. Kraft Collection – “Quote” og Olde Curiosity Shoppe Collection – “Butterfly Species”. My Mind’s Eye – Love Me Do “Head in the Clouds”

 This altered clock was in print on October in the magazine, Ett trykk.


søndag 8. september 2013

A Working Windmill - The European Scrap Battle - An altered project

I have entered the European Scrap Battle.

This is my altered project for round 2. There was supposed to be a vote to get on to the third round, but we all go on to the next round this time.

This windmill was a challenge I got from a friend - Gunn-Eirill a year ago. I was challenged to make a windmill that would produce enough electricity to lighten a small bulb! Those who knows me, know that eventhoug I am Norwegian - I really love Australia. Therefore I thought this had to be an Australian type windmill (actually used to pump water) and an Australian outback house - where the windmill makes a light come on, on the porch.


The house and the windmill is my own design. The papers I have used on the house is Prima - Yesterday lifetime and Fabscraps: Angelic 1 - Angelic Christmas. For the porch, I used Kaisercraft: Recycled - Base Coat. The roof tiles are light gray bazzill from Panduro. I have cut each tile with a silhouette, distressed them with gesso, and glued them on - one by one. The insect netting is cut with a silhouette. The bike on the porch is from Korthobby. Inside the windmill, I have made a small nest out of thin branches and placed tiny eggs and feathers in it.


The Didgeridoo Tilda and Tilda with her Kookaburra are stamped on Kraft and coloured with Prismacolors. The flowers are from Prima and Hobbykunst (Mathia roses). The leaves are from Hobbykunst (Mathia). 


The Koala Hug Tilda is also stamped on Kraft and coloured with Prismacolors


The Windmill from the side. In between the flowers and leaves are pearls, white clay hearts and thin ribbon.


The light will only light when the windmill is turned. The generator is made from an old altered computer fan. These fans need to go so quick to make the led bulb light. Therefore, I made a pulley system. The windmill is connected to a cardboard tube (Inside of a Washi tape roll). This cardboard tube is connected to a smaller plastic bobbin with a rubber band. The altered computer fan (generator) is pulled quicker than the windmill goes round.


The windmill will produce light when it is turned around.


This is how to alter an old computerfan to make a windmill

torsdag 18. april 2013

Altered distress ink storage


I have altered a box, and made a distress ink storage out of it. The box was painted black. Then I used aquarelle paper for the panels, sprayed with dylusions spray.


I have made individual shelves tor the distress ink pads inside the box. The shelves have been made from black chipboard. I have also marked each pad with the right colour on the side. This box has room for 10 ink pads.

So for all of you who wants to know where you can get a box like this from....


This is the box, and I found it at a flea Market last weekend. I think it originally was a box for a wine bottle.


The outside panels were sprayed with dylusions spray. Then I added pattern using gesso and handmade stencils. The text is from Tim Holtz - Stuff 2 say. The gears are also from Tim Holtz - Mini Blueprint 3.


The man with the umbrella is a dies from Tim Holtz - Umbrella man. I have cut the man in craft foam and stamped with it. I have used acrylic paint to stamp with. The gears are cut from gold paper with a silhouette.


I have also cut some gears with a Gear dies from Tim Holtz, coloured them with my distress inks and named them. 

Because the dylusions sprays are water soluble - it will give colour quite easily  Therefore, I have spray coated the finished box with clear lacquer.


 I am entering these challenges:


tirsdag 5. mars 2013

Some good news and an altered book

I have just got accepted into the Design Team at Hobbykunst


I have had a few Guest Design challenges from them, so I am thrilled to be part of their main design team.

My first task was to make an old book stand out of a frame, and decorating it with flowers. The original idea is from Janine KoczwaraSo this is how I  solved the task :)


The frame is a wooden frame from Prima. The first task was to get the book to stand out from the frame. I have swapped the cardboard backing in the frame, for veneers wood. The book has been attached to the wood with screws and wall brackets. The wall brackets has been covered with the paper to hide them. The background paper is from Kaisercraft - Mystical Secret Admirer. The book cover is covered with paper from Kaisercraft - Humble - Secret Admirer 


The little bird house, hanging from the book - has been drawn. Then it has been cut with scissors (including the fence). The house has a rocking chair charm on the porch and a bird cage charm hanging from the roof. Inside the small bird house, I have fixed a small chandelier made from paper, with some crystal bling. The chandelier has been cut with a silhouette.


A lot of these flowers an leaves are Mathea flowers. The flower vines are also made from Mathea flowers.


I have used several small birds form Hobbykunst on this project. The tiles are made from cardboard covered with paper from Kaisercraft - Sweet Love Die-Cut Paper - Secret Admirer. I have used large doilies and smaller doilies. The smaller doilies are made with a Martha Stewart - Embroidery Large Double Punch


This project is going to be on the wall in Hobbykunst in Vestby :)


I am entering these challenges:


Related Posts Plugin for WordPress, Blogger...