torsdag 16. juni 2016

Adventure awaits - Dream Catcher

Kaisercraft's designers have created Dream catcher inspired crafts today. 

I created a dream catcher out of a plastic ring, cotton thread flowers and Kaisercraft's Boho collection.


The dream catcher has been decorated on both sides. First I created the web of thread inside the ring. 


Then I added strings to the bottom half of the ring, and mounted paper feathers and a banner in the rings. I also mounted some lace.


Then I decorated the ring with flowers and collectables.


Kaisercraft Product:  Boho Dreams: P2107 Feathers | CT858 Collectables | Em927 Cream Lace pack | F662  Coral Paper Blooms | F649 Mini Paper Blooms Sage.

onsdag 15. juni 2016

Make your dreams happen

Boho dreams is one of Kaisercraft's collections for this month. This is one of my items for my blogpost for Kaisercraft this month.


I really wanted to create a dream catcher with this collection. I found that using a sewing hoop worked well as a base for the dream catcher.


I fixed the paper to the hoop and cut out the pattern, using the Mandela designer template as a stencil. Then I used a stencil with gesso on the background to create the white text. I also added some orange Kaisermist on the background.


I have added lots of flowers paper flowers and fussy cut flowers. I also fussy cut some feathers from one of the papers and added to the bottom of the dream catcher.


Kaisercraft products: Boho dreams collection: P2112 Daydreamer | P2114 Adventurer | P2107 Feathers | PP999 Paper Pad | IT913 Designer Template Mandela | IP 727 Ink Pad Lagoon | IP729 Tangello | F662  Coral Paper Blooms | F632 Paper Blooms Sage | F644 Mini paper blooms - coconut | F667 Mini paper blooms Coral | F647 Mini paper blooms Iceberg | F648 Mini paper blooms Sea Breeze | LDB1055 Wooden shapes Flowers | KM108 Kaisermist orange.

Other: Sewing hoop

søndag 12. juni 2016

Storage box for the Fuse tool with Prima products

Some time ago, I bought the Fuse Tool  from Hobbykunst. The Fuse tool is a fantastic invention to create your own pockets in plastic sheets. You can use it to divide pockets in PL album pages. It can also be used to create pockets for beads and other bits and bobs, that can be "locked" inside a plastic pocket. 

The box I have used here, has been made from scratch to get it to the right size. The measurements have been taken from the Fuse tool. The box has been built in cardboard. 


The box has been covered with apers from Prima's French Riviera collection


The box has got some simple legs added to it.


The flowers and leaves are from Prima. Some of these are new collections and some are old. 


I have used Prima's Blooms sprays on the paper, before I decorated it with flowers. 


Behind the leaves, I have used Finnabair's microbeads and glass glitter. The diecut in the background is from Tim Holtz  - Frameworks die Honeycomb. I have also used brown Cricles from Rayher on the background. 


I have used a simple locking in the lid, to make a box, where the lid i stable on the box, when the box is closed. 


Products used: 

Prima: Journees De Reves et Aventures - French Riviera Prima bloom spray - Soft Teal Prima: Gold Rush - Art Ingredients Glass Glitter


I am entering these challenges:


torsdag 9. juni 2016

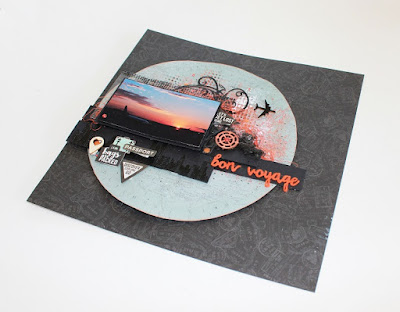
Bon Voyage layout

We are showing the "Just Landed collection" with wooden flourishes in kaisercraft's blog today.


I have created a mixed media layout with mists, stencils, collectables and the wooden flourishes.

FL576 Wooden Flourishes Travel


The background has been created with orange Kaisermists, stencils, gesso and black ink.


The city scene has been created with a stamp and black embossing powder.


I have used coloured car polishing wool, sewing thread, die cuts and papers i layers. The plane has been coloured with black embossing powder. The compass has been coloured with orange Kaiserink. The words has been cut out from an orange foam board.


Kaisercraft Products: Just Landed Collection | P2097 Just Landed | P2102 Subway | CT857 Collectables | CS265 Clear Stamps | FL576 Wooden Flourishes Travel | DD547 Decorative Die Circle Vines | IT 911 Mixed Media Designer Template | KM108 Kaiser Mist Orange | DD711 Travel Word Pack | IP729  Ink Pad Tangello | IP719 Ink Pad Black | CD603 Premium cardstock Black.

mandag 6. juni 2016

Mixed media canvas with Finnabair's Rust Paste

This is a 12x12 mixed media canvas, using Finnabair's Rust Paste and one of her paper pads.


Last January, I went to CHA and some of the people I meet was Keren Tamir and Finnabair. I have wanted to do a mixed media layout or canvas out of the picture for some time. Now that I managed to get hold of Finnabair's Rust Paste and one of her paper pads, this was the right time to create something with the photo.


Using Finnabair's Rust Paste


To use the Rust Paste, create your mixed media item, gluing the different pieces together on the canvas or your altered project. Paint everything black with acrylic paint. Covering the item with Finnabair's Gesso first, will make the acrylic paint stick, even to metal. (PS: Almost nothing sticks to hard plastic, but these items can be covered with decoupage glue and a thin layer of a serviette before they are painted)

The pastes has a thick sandy texture. Start with painting the canvas or altered item with  the dark brown paste. You don't need to cover everything. The black paint is supposed to show in all the nooks and crannies, giving impression of shadows. Add some of the lighter brown paste i some places. Add the yellow paste with a sponge in a few places.

On this canvas, I have also painted black gear paper die cuts with the Rust Pastes.

Finnabairs tutorial:


Details:


I have used an old lace table cloth, layered it with ruffles, and glued it on the canvas using fabric hardener.  I have also used pieces from an old sewing machine and gear diescuts.


The ruffles shows better on the right side of the canvas.


I have added flowers from Prima and Wild Orchid craft.


The words Imagine, are wooden, and painted to match the photo.


I am entering these challenges:


torsdag 2. juni 2016

Boho dreams tricycle

It is time for a new challenge in Kaisercraft's blog. I have created a tricycle, using Kaisercraft dies and straws. 


The challenge this time, is crating any kind of Kaisercraft based papercraft with the inspiration from the Mood Board.


I got inspired by the bike, and wanted to create a bike based on diecuts made from Kaisercraft dies. 


The frame of the bike, is made from straws, covered with paper.


The basket in the front has got small paint brushes, glitter tape, a small pair of 
scissors, flowers and a few small sheets of patterned paper.


The front wheel is made from DD547 Decorative Die Circle Vine and DD706 Decorative Dies Cogs. The little flag at the back is from the collectables.


Kaisercraft materials: Boho dreams: P2107 Feathers | PP998 Paper Pad | CT858 Collectables | SS315 Sticker Sheet | FL576 Flourish Travel Pack | F667 Paper miniature Blooms Coral | F648 Paper miniature Blooms Sea Breeze | F662 Coral Paper Blooms | DD369 Decorative Die Oval Vintage Frame | DD547 Decorative Die Circle Vine | DD706 Decorative Dies Cogs | 

Birthday shaker card with Olaf and Sven.


A lot of kids really appreciate hand made cards. The cards can be quite simple.

Hobbykunst has got the the fantastic new papers with Minions and Frozen figures. Here, I have created a simple shaker card for a boy with Olaf and Sven.


Arket er tatt fra Disney's Frozen blogg.


This paper is one of two paper sheets chosen from the Frozen paper pad.  You can find what I created with the girl paper pad in this blogpost.


A lot of boys do like the Frozen film, and would really like a card with some of the figures from the film. Although they would often like the card in a more masculine cersion, without any princesses. Olaf and Svein are super as figures on a card for a boy.

It is very popular to create shaker cards, but often crafters don't want to make complicated cards for a kids birthday. This shaker card is simple to make. 


Creating the shaker card

Here, the cellophane bag and the patterned paper, has decided the size of the card. The piece of paper has been added inside the card. Then, the snowflakes and beads has been added to the bag. The bag has been locked in the top, and a piece of bazzill has been added to the top. The bazzill has been scored and folded after 2cm, and folded to create the back of the card.


Decorating all the sides of the card?

It is not always you want to decorate all pages of the card. However, I think it is nice when all the pages are decorated, and the card seems more "finished". 


This paper has a cute back side. This paper shows inside the cellophane envelope. The rest of the inside of the card has been decorated with left overs from the paper. I have also used a diecut, created with a die from Papirdesign. Olaf, inside the circle, has been cut out of white felt.. I have used googly eyes. Arm, mouth and eyebrows has been created with Cotton thread.


There was not enough paper for a complete panel on the back. Therefore, I have used two pieces with a paper band, created from the paper, in between. 
Related Posts Plugin for WordPress, Blogger...