tirsdag 14. april 2015

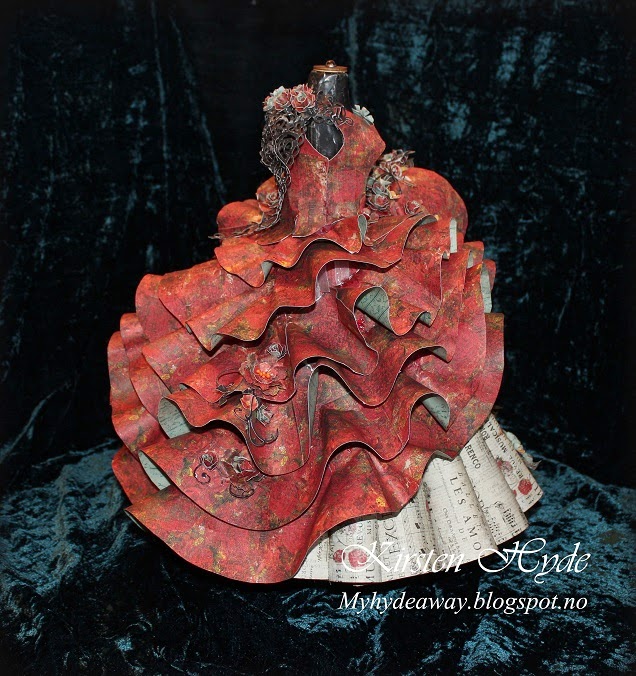
Prima Bella Rouge dress

I have been following the CHA shows for a few years, through photos online and from photos taken by some of my friends. It is always exiting to see new trend within the art and crafts. Prima showed Bella Rouge collection during the CHA - Winter 2015. The Bella Rouge collection, gave me the inspiration to create a "Flaminco" dress with lots of ruffles. 

I wanted to create the dress form, the dress and the flowers on the dress from scratch. I created a video tutorial for the dress form and a photo tutorial for the flowers. I also wanted to create the dress, using papers only from The Bella Rouge collection. I have only used some sheets of paper of Prima's - The Archivist-Le Collectionneur - to create the dress form and some swirls and leaves for the dress.


Creating the dress form:


Dress form tutorial


The process of creating the dress

The dress has taken me about a month to do, in between other crafts, work and classes.


I started creating the under skirt out of normal copy paper. I also added the folded skirt over the top. Then I added a crinoline.


Then I created the ruffles. The ruffles are added onto the crinoline skirt. All the ruffles has to be worked with to make sure they fold the right way. I did this by adding a rectangle or taking away a rectangle in ruffles when needed. The ruffles were taped back together. 


When the ruffles were full of tape, I started over - creating a new ruffle by using the other one as a template. I did this about 5 times with all the 5 ruffles before I was satisfied.


Then, I took of all the skirts and ruffles and used them as templates to create the underskirt....


.....the skirt....


.... and the ruffles. 

I also made a top for the dress. The shawl is created from paper, using two cutting template from Birds cards as a base.


Creating the flowers

All the flowers for this dress are handmade.


I am entering these challenges:


A dress form tutorial

A while ago I decided to decorate a dress form. My problem was that I could not find a dress form to decorate. I surched for different ways of creating one myself, but I did not seem to find the right things things I needed. I read somewhere that someone used dolls. I wanted my dress form to be larger than a barbie/ bratz doll and I wanted a dress form with a different shape. 

So, after some testing, I managed to find a way of making a dress form out of a bottle, tissue paper, newspaper, wood glue and a candle stick. 


So this was my dress form. I have used decoupage and Prima paper on the outside, to create a smooth surface.


Video tutorial:


My version on the decorated dress form, will be posted in my blog in a few days.


fredag 10. april 2015

A Mixed Media Altered Wedding shoe

 This shoe is a challenge from a good friend, Helle. She got hold of a pair of new/old shoes to alter (which seems impossible to walk in - and therefore they were unused). I got one of the shoes, and then she is going to do the other.

This shoe is also made as DT submission for Scandinavia paper fun's new challenge - spring.


 The shoe has got a base coat with white paint. Then I added the paper under the zip, and the zip.  After this, I worked on the texture of the shoe itself.


The butterfly is a diecut from an old Prima paper. The key is from Ingvild Bolme - Stamp-N-Add from Prima. The flowers are from Wild Orchid craft. I have also added a pair of wedding rings under the butterfly. I have added a Prima crystal on one of the rings.


The idea for the Zip around the heel, came from a pair of shoes I found in a shoe shop a week ago. The rose paper and the sentiment is from Kaisercraft's Blue Bay collection. The heal of the shoe is covered with glitter from American craft.


The texture of the shoe can be seen on the other side of the shoe. I have dry painted with MetaMica to reveal the texture. 


I have used a leather band, painted with MetaMica, to cover the edge of the shoe.The small roses are Mathia roses from Hobbykunst.


Wishing you a creative day :)


I am entering these challenges:


mandag 6. april 2015

A Flower tutorial

Today, I have created a flower tutorial for StampARTic. I am working on a larger Prima based project at the moment, and I have a lot of left over papers. I decided to go all the way on this project, and create everything for the project from scratch.  This is how I made some of the flowers:


Here is a few hand made flowers in different sizes. The paper is from Prima's "Bella Rouge" collection.


To create these flowers, I have used Tim Holtz "Movers and shapers" and a set of Nellie Snellen's punch and embossing flowers.


Simple roses


Small roses can be made with different flower punches and diecuts. You may use one kind of diecut flower, or you may use different sizes of diecut flowers. If you choose to use different sizes, you use the smallest flowers in the centre and the largest ones at the outer edge.


Start with a flower diecut.


Flower bud: The middle of the flower had to be glued the opposite way to the other diecuts for the flower. Leave the side of the paper that you want to show down, and glue the middle of the flower together on the part of the paper that you don't want to show. Find to petals that are opposite to each other, and glue them together with a glue gun.


You have now created a small flower bud. If you would like to keep it as a bud, you may stop here. Use a small green star die cut under the flower bud.


If you would like to make a rose, glue a new flower diecut under the bud, with a glue gun.


Go on to glue the die cuts of flowers under the flower, until you have the flower density that you want. Make sure the petals in the different layers overlap. Bend the petals into shape.


Finished roses. These are made with a flower bud and two flower die cuts.


Rose with different sizes flower die cut.


Use the small flower created above. Glue the flower into the middle of two layers of a larger flower die cut. make sure the petals overlap each other. Use a glue gun.


Fold the petals, using a knitting needle.


Flower with Bead Berries


You can get "Bead Berries" from the shop. These can be used in the middle of flowers. Use a diecut from a small flower. Make a hole in the middle of the flower and pull the strings through - from the top of the flower.


You have a flower stem, flower, and beads in the middle of the flower. Glue the stem in place under the flower with a glue gun.


Make a hole in the other flowers and put the stem trough the holes.


Glue the stem behind the flower, use a small paper circle or flower diecut, and glue it under your flower.


Fold the petals, using a knitting needle.


Wishing you a happy spring

fredag 3. april 2015

Kaisercraft Design Team 2015 Entry

Kaisercraft has got their DT call out, and I wanted to have a go.


I have created 3 brand new projects with new collections from Kaisercraft. 

Beyond the Page/Altered Item and Mixed Media


This is made with Sky Blue Collection. The box frame is hand made out of wood.


Layout and Mixed Media


This is made with Rustic Harmony Collection. The photo of Uluru, is a photo I took a few years ago. 


Altered, Mixed Media and a card


The lantern is made from Betsy's Couture. The lantern is my own design, and I have made a tutorial for this lantern.

Older Kaisercraft items:

Kaisercraft Cubord:


This was made for Hobbykunst - Megastore, and had been on show in the store.


The Alice in Wonderland Altered Clock


This was made for Hobbykunst Megastore, an has been on show in the store. The clock was made from an old MDF vase. The clock works, and led lights has been connected inside. 


Altered book


This altered book, was made for Hobbykust Megastore after a request. Something similar was spotted at CHA, and this was made as a different version of the altered book.


Update from 23.rd of April 

I am in the final! 


Related Posts Plugin for WordPress, Blogger...