When creating, one can use lots recycled items. This time, I was challenged by StampARTic to create something with some old jewelery. I used an old glass bead and metal from an old necklace and created a steampunk lantern.
The lantern is a silhouette design by Gunn-Eirill. I have added the panels for the windows.
There is room for a battery operated tea light candle inside the lantern.
I was invited to a Creative Blog Hop by Maryann. This hop is about sharing a bit about oneself, and to show you some inspiring blogs. Maryann invited me to join a week ago, and wrote a bit about me in her blog.
Maryann has been one of those who has visited my blog for a long time, and always leave comments, which I really appreciate. She is a devoted crafter, who makes cards, parchment cards, sewing and creating baskets, boxes and other paper crafts.
At the moment, I am preparing a few craft classes for a craft gathering in Kjøpsvik (Nordland), Larvik (Vestfold) and for Hobbykunst (Akershus).
This is a Graphic 45 canvas I created in June. This was a DT task for Hobbykunst with brand new G-45 papers in the shop. I will give classes in this soon.
Here is a Mixed Media canvas, which I will be giving classes in in Kjøpsvik at the end of the month, and class materials has just been packed.
This Pop up album, is another class I will be giving in Kjøpsvik. I am currently working on the course material for this class.
Three years ago, I made a vintage car. I have had a lot of questions about creating a silhouette file for this vintage cars. I have been busy redesigning a silhouette file from the old template, and have offered it (copyright terms) to those who sent me a message. This has taken off a bit - and I am looking forward to see a lot of paper cars soon :)
I also took a class with Andy Skinner a few weeks ago, and have started a project using some of his mixed media/Decoart techniques.
I am also currently working on a few DT projects and preparing for StempelScrapmessen, where I will be helping Hobbykunst on their stand with a few demos. Well - not telling more about this yet.
What do I make, and what is my style?
I love crafting. I am trying to create my own style, often on the borderline between Steampunk/Mixed Media and vintage. However, I do like to try new styles and different craft products. I often use a 3D element in my work and a lot of details.
This was a canvas I made for Hobbykunst. Everyone in the Design team made a layout, that was would describe yourself. This canvas is on display at Hobbykunst.
This is a pop-up plane card I made for the initial round of The European Scrap Battle last year. It was also my design team application for online craft magazine StampARTic. The plane is my own design (template in the blog).
This is also I card I made for The European Scrap Batlle. It is a sliceform birdcage card. It is made from a mixture of Magnolia and Graphic- 45 papers. The birdcage is my own design (template in the blog)
Christmas glitter houses. This was my semifinal contribution in alter for The European Scrap Battle.
Alice in Wonderland clock. This was made as a task for Hobbykunst. I was asked to alter an MDF vase, and I altered it to become a working clock, The clock is inspired by Graphic - 45's Alice in Wonderland. This clock is on display at Hobbykunst.
This was a Mixed Media, made for Hobbykunst. It is currently on display in the shop.
On the Wild side. This was my first layout created for Hobbykunst. This is currently on display in the shop.
Creating is a lifestyle for me, and I have been doing this since I was little. I try to get some time for crafting each day. I also love to be able to teach and inspire others.
How does my creative process work?
I often start with a main idea. This could be the shape, the colour or just an idea of what type of art to make or what to decorate. Sometimes I have some guidelines, for instance a DT task, a demo or something for s specific art class. Other times, I might want to make something for a challenge or a competition - and would then have some guidelines for the work. I use a lot of time to develop the idea. I am not really a CAS girl, and my crafts could take a lot of time to finish..
I get a inspiration from a lot of places. I could be going to an antique shop, on holidays, going through blogs (Pinterest), looking at papers, with paper crafting friends or just going to a craft shop. I have also done some classes to learn about new products and styles, and this is always inspiring.
I would also like to introduce 3 friends, and their blogs. These are 3 people who I find inspiring.
This is a really creative friend, and always inspire me a lot. She is a super 3D artist, who really, really loves creating with papers from Graphic 45 (and Prima flowers). Her art is always very detailed. She was picked as one of 30 to to be on the last round of Graphic 45 Design team pick this year - and the only one from Norway.
Laurie is a super 3D and Mixed Media designer from the US. Her art is always very detailed. I have been following here for a while, and she is always inspiring me a lot.
Stina is an artist i got to know through The European Scrap Battle. We were against each other in the semifinals in alter. After this, we have kept in touch, She is also doing an online craft magazine, and organize craft gatherings, like me..She is a great paper artist, with lots of details, and always very inspiring.
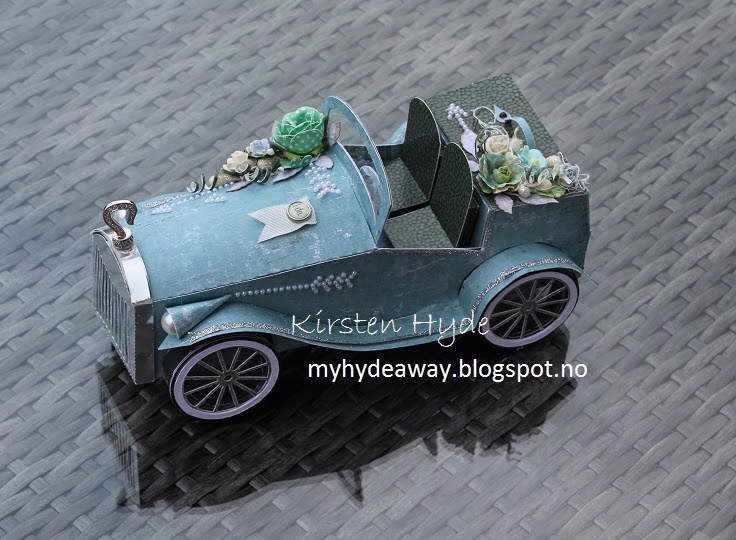
In May 2011, I made a vintage vauxhall car with a rubber band engine. The car was built as an example of how to make a rubber band engine for kids. The car was then gives as a wedding card(d) for a friend who sold cars. It was important to me, that the car was similar to a real vintage car, therefore the car was made by looking at photos of real and toy vintage vauxhall cars. The blogpost with this car has had more than 5500 hits on my blog - and the blogpost which still have most visitors - 3 years later.
The car was made a few weeks before I got my Silhouette. The first car was made without any cutting device, but just with with scissors. I published the hand drawn template in the blogpost 5.th of June. After I published this car, and the template, I have had several questions about creating a silhouette file for the car. I therefore used my own template, and redrew the template to create a silhouette file. I have added seats, wheels and lid for the boot. I have changed the bumper, and it is based on a photo of a real vauxhall car. I created a new car with the silhouette file. I am giving away this silhouette file, just contact me for the file (see copyright before you use it)
I used papers from Maya design, Vintage summer basics, for the car. The seats and lid for the boot is made with paper from DCWV, the textures and finishes stack.
The car head hood ornament is a part from an old juvelery
Leaves are made with a Nellie Snellen Leaf Punch and emboss. The leafs have been distressed with distress ink. Flowers are from Prima and Wild Orchid Craft.
I have also used strips of silver tape from Søstrene Grene.
The bling arrows are from Prima
The boot of the car is the same as the earlier version of the car, but I have added a lid, so the car is also functions as a small box with room for a treat.
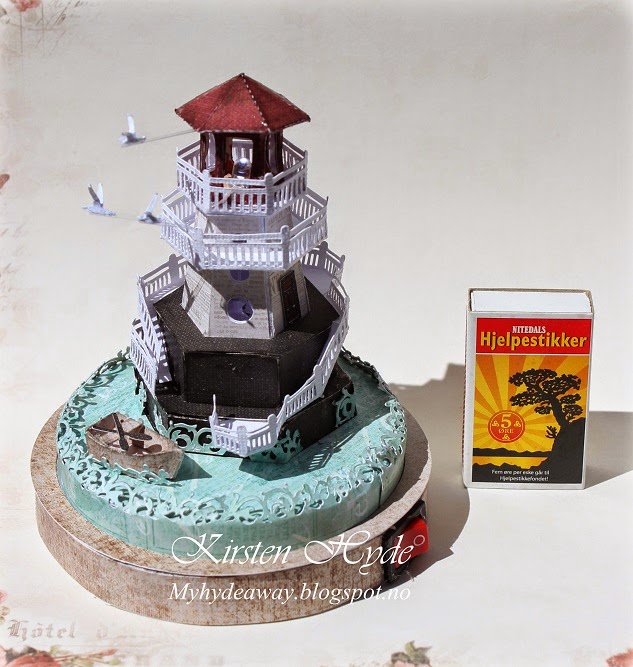
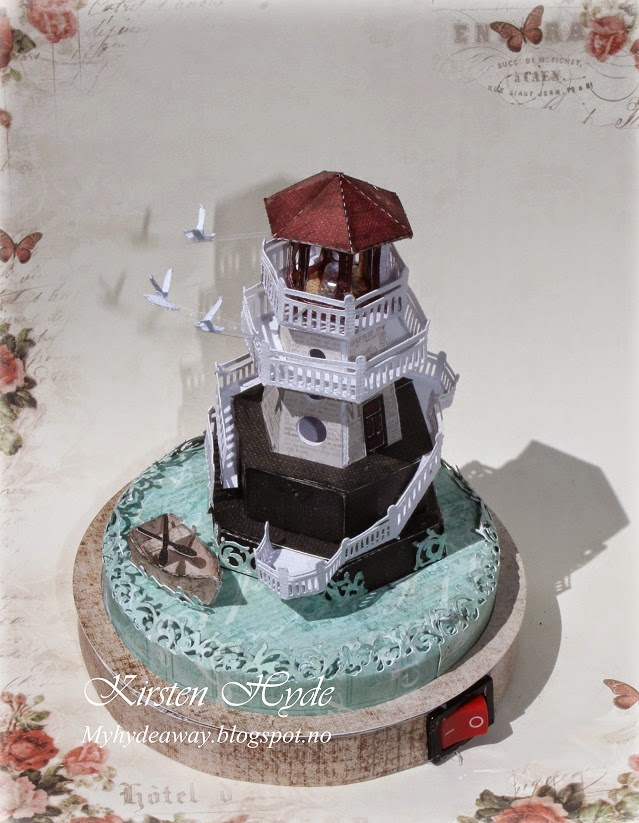
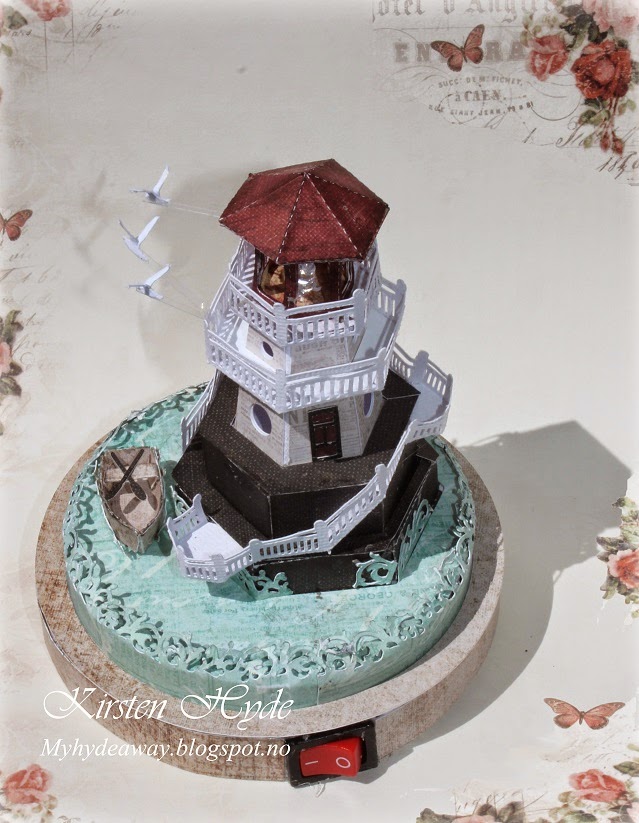
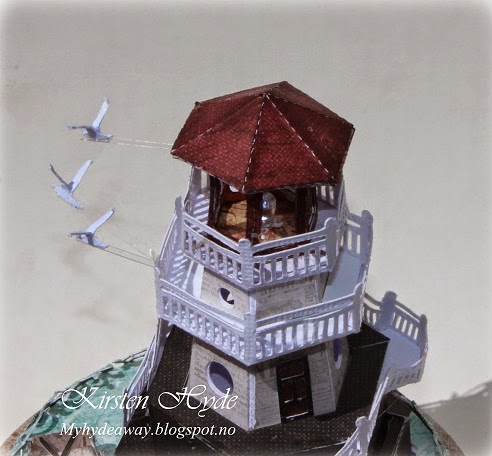
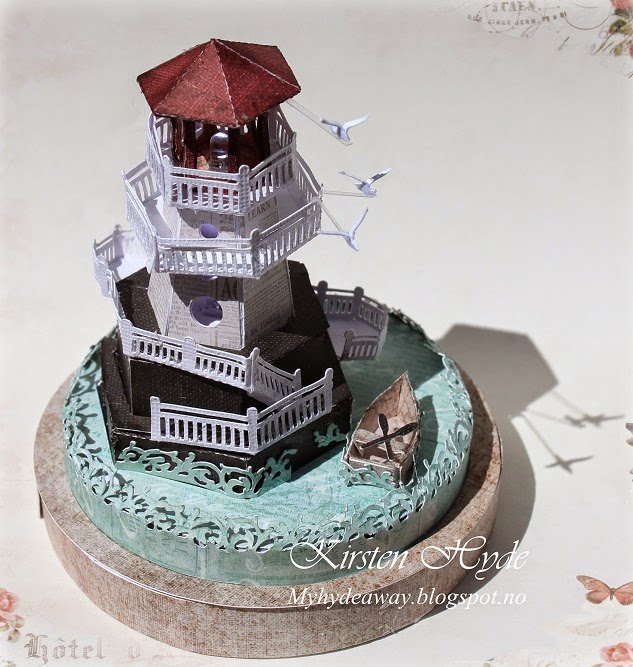
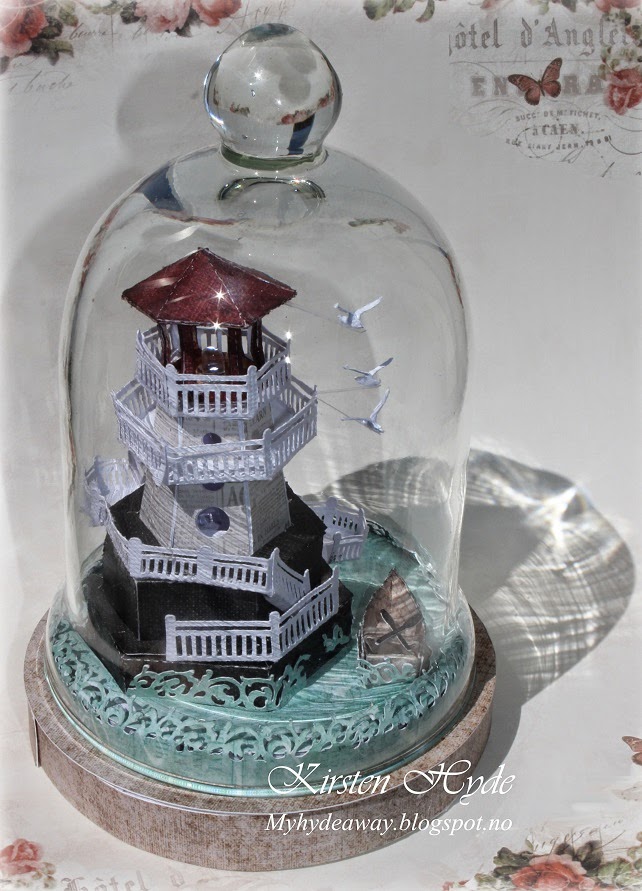
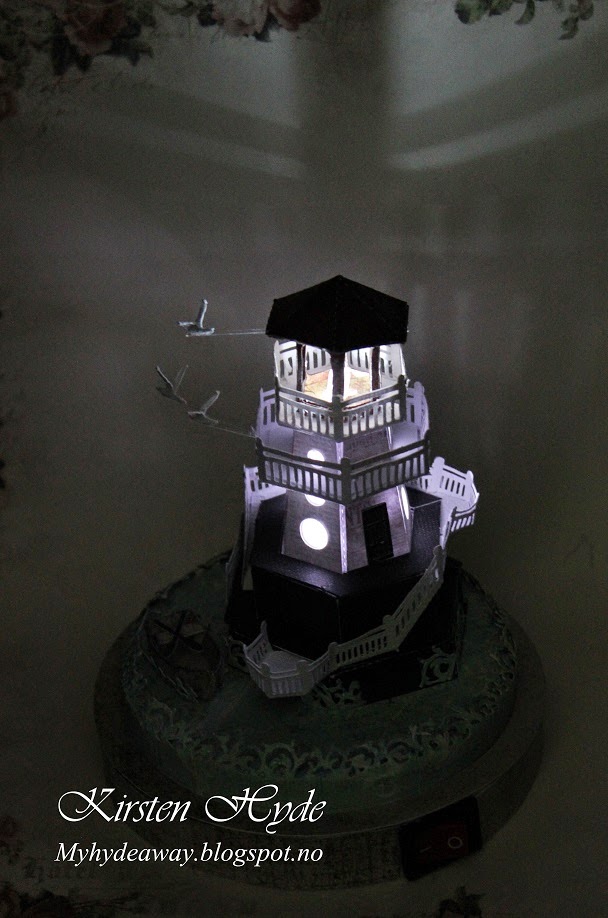
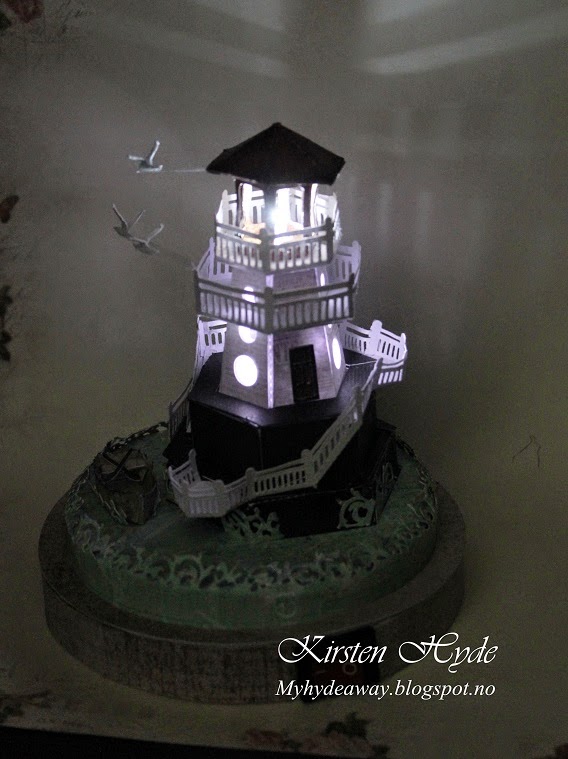
A few weeks ago, friend Gunn-Eirill, challenged me to make her lighthouse. If is not often I make something from a template, a cutting file or after instructions, so this was a challenge.
I decided to make the lighthouse as it was, but make it as a miniature under a glass bell, that I got from a jumble sale. I also wanted to add a few things to it - to make my own version.
I made the lighthouse 7cm tall (without the base, and the black cliff).
The first thing I did, was to create a modell to se if it was possible to cut Gunn-Eirill's lighthouse as small as 7cm. I have a saying: "Everything can be made" So I was not going to give up. After working with the silhouette file cutting the lighthouse - it was time to test if it was possible to put together. And yes - it was possible. To create something that was my own version - I wanted to make a small sea and a cliff for the lighthouse to stand on.
I also wanted to only use Prima papers for the lighthouse and the base. The papers are from different collections from this and last year. (Seashore collection, Cartographer selection, Stationer's Desk Collection and Something Blue Collection). I only wanted to use paper for the creation - and everything handmade.
I also created fences and terraces to go around the lighthouse and the cliff. The waves is my own cutting file - and I have scaled it down as much as possible with the silhouette.
To create the Seagulls, I traces a photo of a seagull - edited the wings, and made them 3D. They have been glued to a pice of thin clear strip of acetate to give the impression of flying.
The bell jar was originally bought at a Jumble sale - and was bought to create something out of.
Any lighthouse should have working lights in them. This house is so small, that the only possibility for working lights, was to mount led lights in it. I mounted a switch on the side of the base, to turn the lights on and of.
One of the great things with crafting, is that it has given me friends all over the world. Some times these friends give me challenges from time to time. This time, Laurie D Moore challenged me to create something from a Paint Brush. I have seen these paint brushes before - but never thought of alter one - but a challenge is a challenge.
I started with the largest paint brush I could find. The handle was blue plastic and really ugly. Paint will not stick to plastic - I have tried that before, and everything peals off. I have found that the best way to decorate plastic is to use decoupage or Modge Podge, and cover it with paper serviettes or with paper. I covered it with papers from Prima and Modge Podge. I then painted with Gesso and sprayed a thin mist of black dylusions spray.
I have used different bits from computers, typewriters and gears from an old clock. I also sacrificed one of my old paintbrushes. The metal has been coloured with different paints and stains.
Do pop over to Lauries D Moore's Challenge to follow the work shown there. Great challenge - that also challenge you to use some of your old unused crafting stuff.
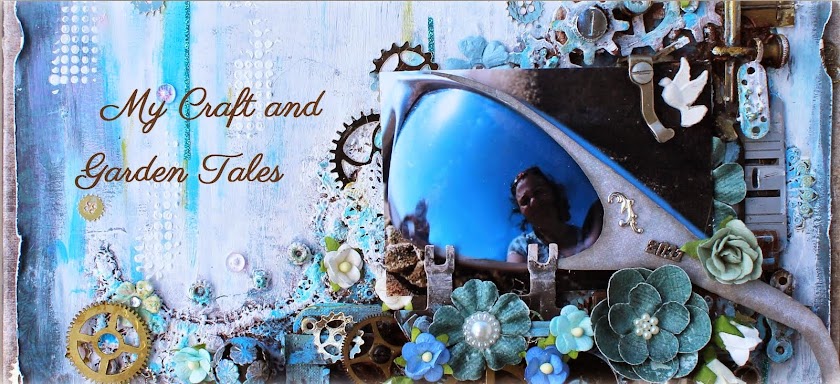
This canvas is a for a class I am going to give on Mixed Media. Mixed Media is defined as art, where you use more than one traditional media, for instance more than just paper. In scrapping, one often use paper, metal, flowers, string and materials like cheesecloth or lace.
This Mixed Media canvas is 20cm x 20cm. I have used papers from Prima and Bo Bunny (Somewhere in time collection) and Prima - Delight -Delicate. Flowers are mostly from from Prima.
During the class, we will also work with distressing, stencils, different paints and stains, gesso, how to create more 3D effects on your work. We will also go through ideas of what "free bits and bobs" you can use for your mixed media work. This class will be in Kjøpsvik in August.
I wanted to use the canvas inside out. I covered the back of the canvas with paper from the "Come away with me" collection, and also covered the wooden frame. The "wooden" floor is a paper from Kaisercraft - Distressed base coat.
The bricks are made from DAS clay, rolled out and cut into the size I wanted. The street signs are from Prima.
The suitcases are made from Kraft cardstock, embossed and distressed. The labels are die cuts from the Graphic 45 collection. Flowers are mainly from Prima.
The lamp post is my own silhouette design. This is based on a lamp seen in Bath in Sumerset in the UK. The fence is also my own silhouette design, based on a fence seen in Brighton in the UK.
The picture in the background is from the Graphic 45 collection. The picture has been rased from the background to create a 3D effect.