lørdag 30. mai 2015

Prima mixed media canvas with tutorial - published in Ett trykk

If I could make days last forever…..

Jim Croce wrote the song "Time in a bottle", more than 40 years ago. The song text is about  capturing time in a bottle, to keep them forever. This is often the way I feel about the small golden moments. Small kids grow up quickly and we struggle to keep hold of the good days and the memories. A lot of people keep the memories in albums, and this is how a lot of us started scrapbooking. Sometimes the photos can also be used on a canvas or a layout in a 3D frame, and hang them on the wall. These can also be fantastic gifts for a baptism, a confirmation, a birthday or a wedding.

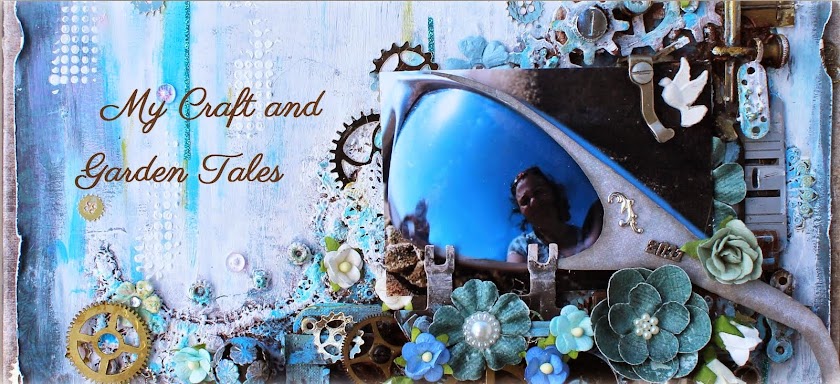
I have created a mixed media canvas (25cm x 25cm). This was published, together with the tutorial in the magazine Ett trykk in April 2015.


The papers are from Prima:  Something Blue Collection – Wedding planner  and  Manifestation Of Love – Epiphany.  Flowers are from Prima and Wild Orchid.


Tutorial


The paper Manifestation Of Love – Epiphany (Prima) was cut to the right size. The edges was cut and punched with Martha Stewart edge punch. The background was painted with Distress Paint and aspunge. On parts of the background, I diluted the paint with water. I used more paint behind, where I have planned to have the photos, than on the rest of the paper.


I used a stencil on the background and gesso, to create structure in the paper.


I created gears with Tim Holtz dies and cardboard. The gears were painted with Martha Stewart acrylic paint and cracle paint.  


I used card board between the layers of papers and the photo to create a 3D effect on the canvas. 


The glue I use for mixed media layouts like this is RX glue and Matte Super Heavy Gel.

Then the canvas was decorated with embellishments and flowers. 


It is important to create some balance in the layout. You can often get this by decorating diagonally across the canvas. 


Ett trykk

This canvas and tutorial was in print in the April's issue of Ett trykk


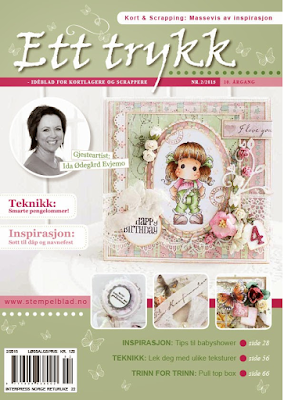
The little girl in the photo with the issue of the magazine and the canvas.


Jim Croce:  Time in a bottle

torsdag 28. mai 2015

Kaisercraft Design Team 2015 - 2016

WOW! This morning started with brilliant news. 

Some time ago, I applied for the Kaisercraft design team 2015-2016 - and I am now on the Kaisercraft design team this coming year! 


Entries for the design team:


I can't wait creating with the new Kaisercraft papers :)


Happy scrapping.

torsdag 14. mai 2015

Kaisercraft Design Team Finalist Entry 2015-2016


3 weeks ago, I got the message that I was one of the finalists for the Kaisercraft Design Team 2015-2016.  I was so happy about this. Kaisercraft has always been one of my favourite brands. Kaisercraft is also one of popular brands in Norway, so it is easy to get hold of, and easy to use for the classes I give. I also love the good quality of these papers - that work well with both 3D crafting and Mixed Media.

Almost two weeks ago, I got the final challenge in the post. There was two brand new paper collections, that were not published, and they were such a treat to work with. The papers were the Time Machine Collection and the Home for Christmas collection. This is what I created:


Time Machine Collection

The first collection I got was Time Machine Collection. This was a brilliant collection for me. I love working with gears, and I also love these rustic colours.

Mixed media layout


I have used papers from the Time Machine Collection. I used edge punches to create the effects around the paper. I have used stencils and distress ink to create the effects in the background paper.


The gears are wooden icons from Kaisercraft and old clock gears. I have also used parts from an old sewing machine and micro beads.


Moments: A minialbum with a box and a pop-up card.


I also wanted to create a set with a minialbum, a box and a card. I also altered a small clock, and used a diecut of a clock face from the paper inside the clock.


Box:


The box is my own design. I have made a small window in the lid. Inside the window, there is a set of gears, mounted together to create a 3D effect. There is also a small watch face inside the window. "Make this moment count" is a text from the papers.


The box has a minialbum inside.

Minialbum:


The front of the minialbum is a sentiment from the papers. I have used lots of really sweet sentiments from the papers in this album.


Inside the album:


I have decorated the album on both sides. Some of the pages has small tags. The tags sticks to the album with magnets. There is also a door on of of the pages. 


Pop-up card


I have created a card with a window in the front. The window is similar to the window in the box.


When you open the card, it reveals a det of pop-up gears. The gears are made with papers in the same collection.


There is room for a message at the back of the card.


Project video:


Home for Christmas Collection

The second set of papers I got, was from the Home for Christmas Collection. This was a wonderful set of papers to work with.


Mixed media layout


I decided to use one of my photos from Kangaroo Island on this page. I have also been fussy cutting some of the flowers an leaves. 


Christmas Church


This little church and winter scene is one of my own designs. I have added diodes inside the church and the lamp post. The battery and switch is hidden under church.


The car is only 3cm long, and you can find the template for this here.


The door is at the back of the church.


The treas are made with one of the papers with a birch pattern.


The little sign is made with text from the papers.


Project video:


Christmas card


This Christmas card is made to go with the church. The lamp post is made with Street light dies from Kaisercraft. The little sledge is made in 3D.


Mixed media Christmas card


This Christmas card is also made from the Home for Christmas collections   The sentiment is from det collection. The little 3D bird box is home made.


I am so exited to be one of the finalists. There are so many talented girls in the final. 


Thank you for stopping by.


fredag 24. april 2015

Prima Marketing Design Team call - 2015

It is time for the annual Prima DT call, and I really would like to have a go.  In this blog post, I am showing a few of my Prima - based projects that I have made over the past year.  


Project One: The Bella Rouge Dress


I have been following the CHA shows for a few years, through photos online and from photos taken by some of my friends. It is always exiting to see new trend within the art and crafts. Prima showed Bella Rouge collection during the CHA - Winter 2015. The Bella Rouge collection, gave me the inspiration to create a "Flaminco" dress with lots of ruffles.

I wanted to create the dress form, the dress and the flowers on the dress from scratch. I created a video tutorial for the dress form and a photo tutorial for the flowers. I also wanted to create the dress, using papers only from The Bella Rouge collection. I have only used some sheets of paper of Prima's - The Archivist-Le Collectionneur - to create the dress form and some swirls and leaves for the dress.

The dress is created in the same way, you would create a normal dress like this, with ruffles over a crinoline. There is a explanation about the basic process in the original blogpost.


Creating the dress form


Project two: My story - a mixed media mini album

In this album, I wanted to capture some of the things that are important to me. I wanted to capture some of the people and creatures that is very close to my heart. Art has also always been an important part of my life, so therefore I wanted to create a Mixed Media album, using different and techniques. The mini album has been created using Prima's Butterfly collection and different mediums.


The album is handmade from scratch, and has 5 sheets inside. I have added about 1 cm room between each page, since mixed media work do take up room.


 Fist page:


I have used a selfie of myself, taken at Shell beach in Australia, inside the cover. There is a flap on the first page, that folds down.


Tutorial for the first page:


 There is a tag hidden behind the first page. The Prima doll is made with paper piecing, and has been coloured with Touch and Promarkers. The hair has been coloured with Prisma colors.


Second page - Nature:


On page two, I have created texture on the background, using lace, beads, letters, metal, gesso and stencil and micro beads.  


The background has been dry painted, and I have then added the flowers.


The photo is from Madame Tussauds in London, and this is my family.


Third page - Together:


There is acetate behind the zipper, therefore the mixed media page can be seen behind the Zipper. The photo of my family can be seen behind the flap.


This is a page made with my best friend and me.


Fourth page - A walk maybe:


 I have used different kind of lace, stencils and gesso, beads, charms, leaf silver and flowers.


Fifth page - Hidden treasure:


This page has a flap that opens to the left.


Inside the flap, is a photo of me, taken at the Incredible Rocks at Kangaroo Island. The photo is taken from inside a cave. The Rock/ cave effect is made in the same way, the rust was made, just painted differently. 


The forest ground is made with lace, beads, parts from an old computer and Prima wood icons.


The page also has a hidden tag.


Sixth page - Let your dreams take flight:


The sixth page is the last page. I have used Mixed Media on the page, adding metal, flowers, beads and an old paintbrush.


Most of us have dreams, and sometime - we have to let them take fligt. The cover has a flap, that opens sideways........ and reveals a small pop - up plane. The plane is my own design. You can find the template for my plane here


You can see the album here:


Project three: 12 cards of Christmas

The challenge of creating all the 12 tags of Christmas 2014, was a great task. I was able to test a lot of new products - but also challenged myself to get hold of the items needed (which was a large challenge in Norway). I have shown some of the cards here, although all the cards can be found in the link, or seen in the video. I won the Bloom girl challenge with my 8.th day of Christmas card, and got a honourable mention for the card for the 4.th day in the beginning of January. 


The collection of all the 12 Christmas cards (and a tag)


Project four: The little house in the forest

This was a small house I designed as a DT project for the online magazine StampARTic. The house is a small box with room for a treat or a battery operated light inside. The house is my own design.


I won PPP - for January 2015 with this house.


Project five: A Prima light house: 

This lighthouse was made during the summer of 2014. A friend of mine, Gunn-Eirill, had designed the basic ligh house - so she challenged me to take the lighthouse a step further. Her design is a large design, however, I wanted the lighthouse to fit inside a small bell jar, and make a scene around it. The waves, boat, fences, black rock and the base for the bell jar is my own design. The light house itself, is only about 7 cm tall.


I also decided to mount a few led lights inside the lighthouse. I added batteries inside the base and mounted a switch at the bottom of the base.


Honourable mention in Prima's PPP for July 2013


Project six: Prima telephone box:

This telephone box was made as an example for a Silhouette class I had in northern Norway during the Easter. One of the tasks for the participants was to design their own telephone box from a photo.


I have also mounted led lights inside the box. This time I have used a small 3V battery from an old computer, that could be hidden inside the roof. The light switch is from an electrical tea light, that I dismantled.


Related Posts Plugin for WordPress, Blogger...