mandag 25. mars 2013

A fairy in a bell jar - with tutorial

As a part of the design team at Hobbykunst, I got a Glass Ornament from Meslissa Francis and was asked to make something out of it.


I made a small "fairy in a bottle". The grass, base and the mushroom is decorated with old book pages. The little fairy boy is cut out from an old book. The fairy wings and butterflies are from Kort og Godt. The cut flower and small fairy in the grass are from an old Graphic 45 paper, Once Upon a Spring Time. 


Around the edge of the glass, I have glued a lace. The glass has a simple circular cardboard as base. This kind of base is not ideal to make 3D crafts om - so I made my own base. I have added the tutorial and templates for my base.  


_________________________________________________________  


Templates and Copyright - Please read.

This is my own template. You are free to use my templates, and publish your own craft. However, it would be nice if you link back to me. Please do not sell or publish my templates, as they are or edited! My templates are copyrighted by law.


Dette er min egen mal. Du kan fritt bruke malen til å lage dine egne arbeider. Du kan også fritt publisere ditt eget arbeide. Jeg ville imidlertid satt pris på om du linket tilbake til meg. Du har ikke lov til å publisere eller selge mine maler, som de er eller redigert. Mine maler har copyright under  Åndsverksloven.


_________________________________________________________  


Template: 

(Click on the picture to get a larger version):


Tutorial:


1) Cut out the pieces. I have used 200g card stock for this base.
2) Use the small circle (top) and the 19 cm long rectangle. 
3) Glue on the flips on one side of the rectangle.
4) Glue the side to the top circle, you now have the start of a cylinder.
5) Use the ring, that the glass will sit on, and the 24 cm rectangle. 
6) Glue the side to the the ring.
7) Side glued to the ring
8) You have to sets for the base. Add some glue to the inside of the ring (not on the side, but on the inside of the ring itself)
9) Put the ring around the cylinder, and adjust the level of the ring - so the cylinder and the ring both touch the table. The base is starting to take form.
10) Turn the the base around.
11) Glue (the bottom) circle to the base. Make sure the flips from the inner circle are glued on the inside of the circle under the base, and the flips on the outside are glued on the outside of the circle under the base.
12) Glue the (decorative boarder under the base) to the bottom of the base.


Tutorial for the mushroom: 


13) Start with your base that you made above.
14) Take a piece of card (I have used 200g)
15) Role the card and glue together.
16) Make a hole in the base to fit the rolled card. I have decentered the hole, because I wanted the mushroom set to one side.
17) Put some glue in the hole and glue the rolled up paper.
18) Use a Styrofoam Egg (6cm).
19) Cut the top of the Styrofoam egg. You only need the top part of the egg for the mushroom
20) Make a hole inside the top of the styrofoam egg to fit the top of the rolled up paper. Add some glue to the hole.
21) Put the styrofoam piece on to the rolled card - and you have got a mushroom.


I am entering these challenges;


Minalbum craft class


I am going to have another Craft Class in two weeks time, at a Scrapbooking event in Moss.

You can get more information about the class by sending an e-mail to
"kurs-blandadrops@hotmail.no"

søndag 24. mars 2013

An Easter egg - with tutorial


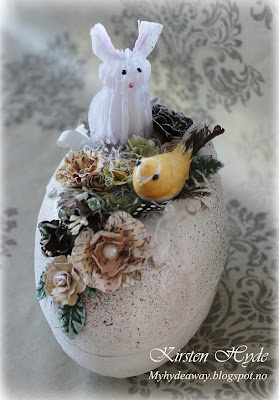
The spring is on its way, and I was asked to make an Easter egg with a rabbit on it. So I decided to make an Easter egg inspired by the spring.


This is a large paper egg, painted with gesso. On the top of the egg, I have created the illusion of the egg paper egg being folded away. This has been made in paper. I have made a template for this.

_________________________________________________________  


Templates and Copyright - Please read.

This is my own template. You are free to use my templates, and publish your own craft. However, it would be nice if you link back to me. Please do not sell or publish my templates, as they are or edited! My templates are copyrighted by law.

Dette er min egen mal. Du kan fritt bruke malen til å lage dine egne arbeider. Du kan også fritt publisere ditt eget arbeide. Jeg ville imidlertid satt pris på om du linket tilbake til meg. Du har ikke lov til å publisere eller selge mine maler, som de er eller redigert. Mine maler har copyright under Åndsverksloven.


_________________________________________________________  


Template 

Scale to a size that will fit your egg, an cut out following the pattern, one part in the same colour as your egg, and the other in green grass colour (or whatever colour you would prefer). The lines in the egg are also supposed to be cut. Glue the green egg under the egg with cut lines, only gluing at the edges of the egg. Glue the egg shape on to your egg and let dry. Fold the triangles out and back over the egg and glue tips of the triangles to the side of the egg.


Before I started decorating, I sprayed the egg with brown dylusions spray. The egg has then been sprayed with fixative. However I was not satisfied with the result, as I still thought the water based dylusion spray could easily run - so I added some spray lacquer. Some of the flowers are from Prima and some are from Panduro. The leaves and the flowers have had a stroke of gesso. 


Template

Scale the template to a size that you like. First, I cut out a piece out of the Honeycomb paper that was large enough. The paper is quite thick, and it is actually several layers of thin paper. I cut out the front and the back of the rabbit, and then I glued the two parts together and did some small adjustments to make it look alright. I added half pearls as eyes and snout, and some pink colour in the ears and cheeks. I also added the tail.


I am entering these challenges:


A steampunk/mixed media Easter egg with "The Ultimate Answer"

It is always difficult to make something for a man. So I had a go with an Easter egg. The first Idea came from  Trine Lise - who used a zip to decorate her egg. I decided that it could be interesting to make an egg that opens with a Zip as well. So I had a go.


This is a cardboard Easter egg. First i glued, chipboard numbers and, and different metal nuts and ring pulls onto the egg. Then, I covered the egg with metal tape and worked the tape around the raised embellishment under the tape. The egg was painted light blue with a mix of Gesso and dylusions spray.


Then I glued the Zip around the egg and another Zip, half open, to the top of the egg. The egg was then painted with darker blue paint, and blue paint in different colours to create an effect on the raised embellishment. The number 42 is just a joke after the film Hitchhiker's Guide To The Galaxy - and is the answer to the ultimate question  "the answer to life, universe and everything".
  

Gesso and dylusions sprays are in general a bit messy.... (Photo by: Gunn-Eirill Gjelseth-Rauan)


The egg was then sprayed with lacquer. I added a few gears, cut from silver paper with a silhouette machine, a few metal nuts and Glass Cabochon. 


onsdag 20. mars 2013

A paper gramophone


This year, one of the tasks in the competition at Ski treffet was to get inspired by chocolate. I bought a box of chocolates, "Gode ønsker" from Freia, and decided to decorate the box. The project started with crafting a cardboard draw for the chocolate box, and ended with crafting a vintage gramophone. The draw with chocolates fits inside the gramophone. And this was the result.


The gramophone box is made of a cardboard box.  It is is covered with paper from  "Melissa Frances - C'est La vie - Newsprint". The draw and the top (under the gears) is covered with "Melissa Frances - C'est la vie - Green Honeycomb paper".


The legs are "Tim Holtz Ideaology: Foundations". The nob on the drawer is from Biltema. The nob was clear silver, and has been distressed with a stamp pad.


 The text "Gode ønsker" has been made by taking a photo of the text on the chocolate box and cutting it out of silver paper with a silhouette machine. The silver paper has been distressed with a stamp pad.


The gramophone tube has been made of  "Pion Design - Till Mor - Klänningar" on the outside and gray Bazzill cardstock on the inside.


 Some of the flowers and leaves are Mathia design from Hobbykunst. Some of the roses are from Minnehjørnet,


The gold paper has been cut from gold card stock from Søstrene Grene.


I have seen several gramophones made out of paper, and several scrapped ones. I made the decision to make a gramophone that could work (in theory). Therefore, I made a paper crank connected to two gears - so the record could turn around. I also covered the gears with blank plastic - to make the gears visible. This gramophone does not work at the moment - but with small adjustments - it should in theory be able to work, and play the record, just by turning the paper crank.


I am entering these challenges:


mandag 18. mars 2013

Easter eggs - and a Yellow submarine

I have decorated some Easter eggs. The first one is made for a friend, who challenged me to make a submarine..... So I made here a yellow Easter submarine! 


This egg is probably on the boarder of being really ugly, but also funny :) The egg has been modified with bits of cardboard. I have covered the egg with metal tape, and painted it yellow.


The yellow egg reminded me about the Norwegian chocolate "Melkesjokolade", which has yellow paper. Therefore I added the text on the egg in the same text as on the "Melkesjokolade" bar.


I have also decorated a pink easter egg. I have used pink left over paper, and gone over it with Gesso. I have added flowers and some ribbon.

søndag 17. mars 2013

Easter heart - DT Kort O Mania


Kort o Mania has a new challenge out - colour combo - white, yellow and brown.


I have decorated a paper Easter heart. 


 The heart was read, and covered with gesso. The flowers are from Prima, and small metalflowers from Korthobby with small halfpearls from Kort og Godt.  The birdhouse is made from a paper bag, and cut with a Marianne dies "a Fence set". The stamp is "Rose Scent Tilda" from magnolia, coloured with promarkers.


The heart i covered inside with paper from 3ndy paper and from My Mind's Eye "Lost and Found" - Sunshine "forever" Dotted Paper. The heart inside is a dies from Nellie Snellen.


I am entering these challenges:


mandag 11. mars 2013

Kurs på Skitreffet


Har du lyst til å lære hvordan man kan lage litt annerledes pynt som du kan bruke på LOer og andre prosjekter? På dette kurset kommer du til å få inspirasjon til å lage mye pynt selv utifra litt annerledes matrialer. Det er fremdeles noen plasser igjen på kurset.


Mer informasjon om påmelding kan du få på Ski treffet sine sider.


tirsdag 5. mars 2013

Some good news and an altered book

I have just got accepted into the Design Team at Hobbykunst


I have had a few Guest Design challenges from them, so I am thrilled to be part of their main design team.

My first task was to make an old book stand out of a frame, and decorating it with flowers. The original idea is from Janine KoczwaraSo this is how I  solved the task :)


The frame is a wooden frame from Prima. The first task was to get the book to stand out from the frame. I have swapped the cardboard backing in the frame, for veneers wood. The book has been attached to the wood with screws and wall brackets. The wall brackets has been covered with the paper to hide them. The background paper is from Kaisercraft - Mystical Secret Admirer. The book cover is covered with paper from Kaisercraft - Humble - Secret Admirer 


The little bird house, hanging from the book - has been drawn. Then it has been cut with scissors (including the fence). The house has a rocking chair charm on the porch and a bird cage charm hanging from the roof. Inside the small bird house, I have fixed a small chandelier made from paper, with some crystal bling. The chandelier has been cut with a silhouette.


A lot of these flowers an leaves are Mathea flowers. The flower vines are also made from Mathea flowers.


I have used several small birds form Hobbykunst on this project. The tiles are made from cardboard covered with paper from Kaisercraft - Sweet Love Die-Cut Paper - Secret Admirer. I have used large doilies and smaller doilies. The smaller doilies are made with a Martha Stewart - Embroidery Large Double Punch


This project is going to be on the wall in Hobbykunst in Vestby :)


I am entering these challenges:


fredag 1. mars 2013

A paper house box with template

This time Kort o Mania has a new challenge - "folding". I have made a paper house with room for some treats. I have made similar houses before - and several people have asked med for the template. You can find the template at the end of this post.


I have used the stamps:  Sunflower 2 from Robyns Fetish,  and "Teddy bear love" from Magnolia. They are coloured with promarkers.


The dog is a freebie - "Hugo - ikke tisse hvor? (Hugo - don`t pee where?)" - and  you can find it here: Måsamotiv


 The flowers in the paper window box is from Prima. I have used Gesso at the edges of the box and on some of the flowers. 


The owl is also a free digital stamp - and this one is from Dustin pike

_________________________________________________________  


Templates and Copyright - Please read.

This is my own template. You are free to use my templates, and publish your own craft. However, it would be nice if you link back to me. Please do not sell or publish my templates, as they are or edited! My templates are copyrighted by law.

Dette er min egen mal. Du kan fritt bruke malen til å lage dine egne arbeider. Du kan også fritt publisere ditt eget arbeide. Jeg ville imidlertid satt pris på om du linket tilbake til meg. Du har ikke lov til å publisere eller selge mine maler, som de er eller redigert. Mine maler har copyright under  Åndsverksloven.


_________________________________________________________  


Template:


I am entering these challenges:
Related Posts Plugin for WordPress, Blogger...